About Ispirer Systems
Ispirer Home Page Ispirer Data Migrator Database Migration
IDM: User Guide
Home page
The IDM Home page displays a list of all created projects along with their associated license information.
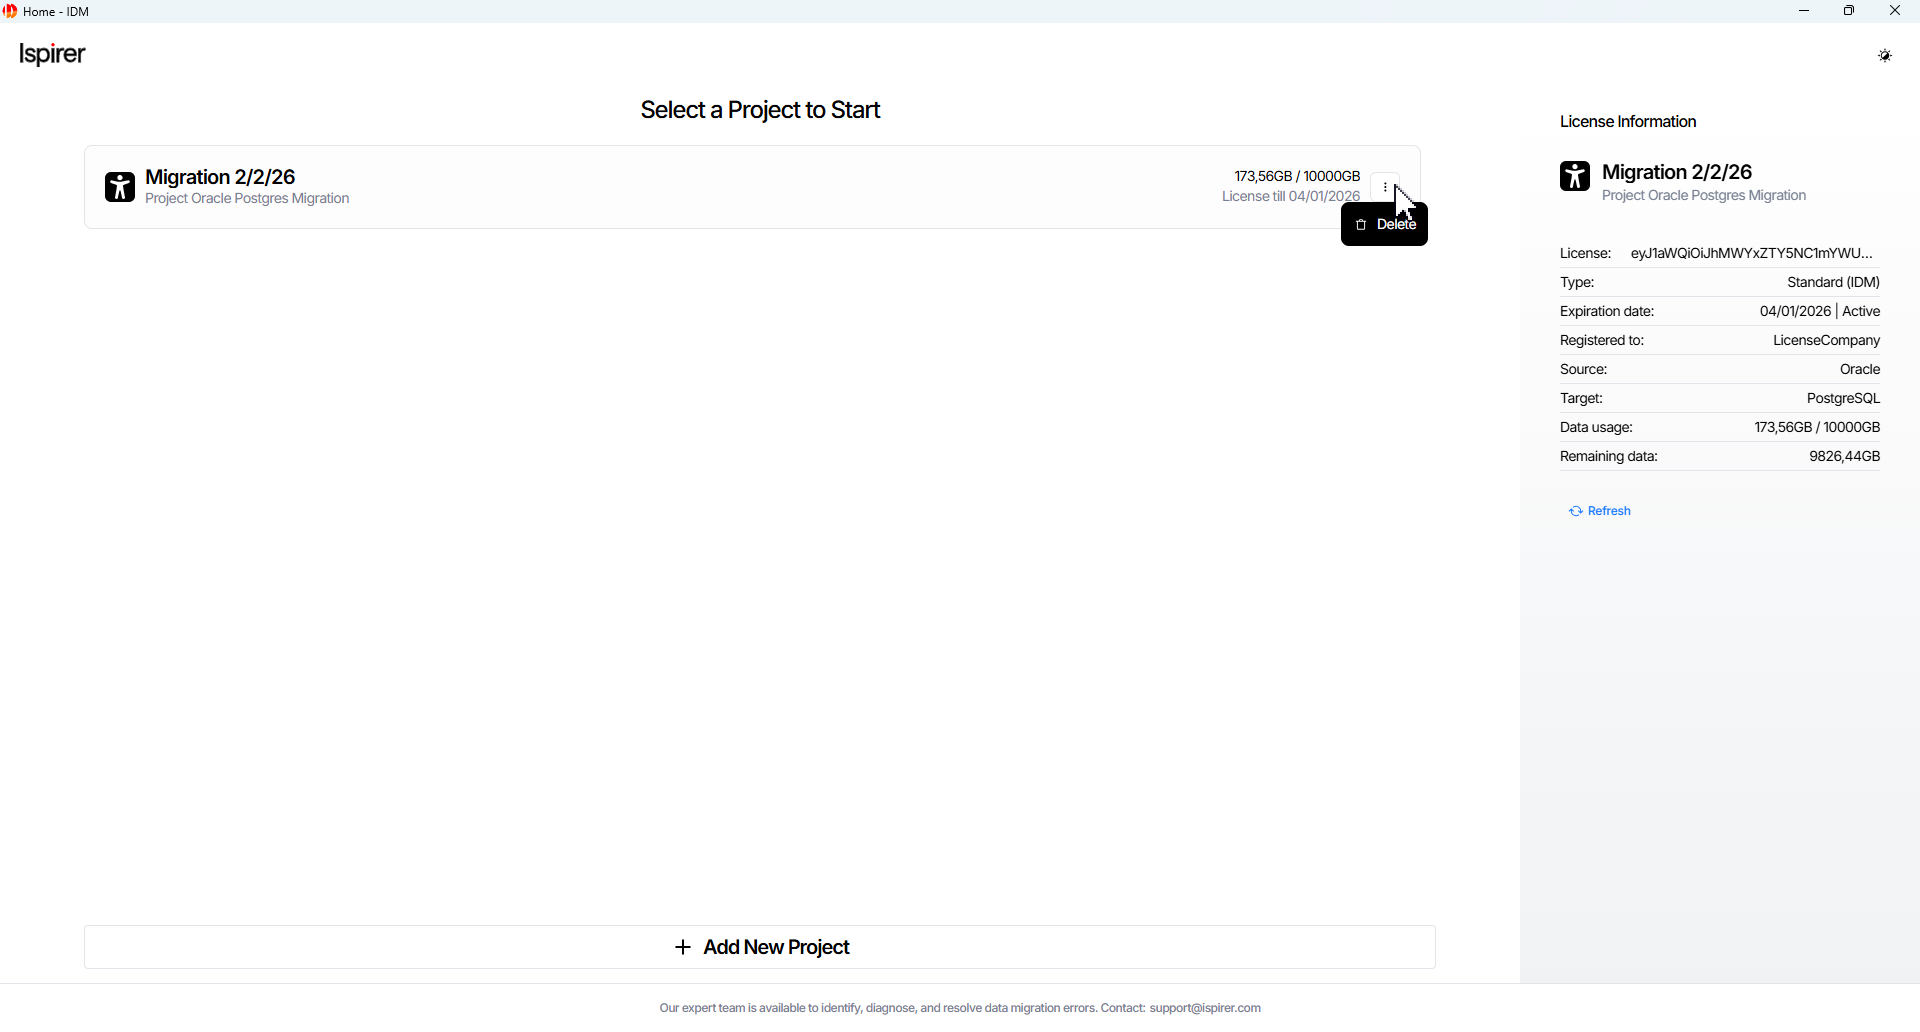
Each Project panel shows the following (if provided):
- Project name
- Description
- License details
- An option to delete the project via the overflow menu
The Delete button removes the project metadata: control schema, migration ledger tables, and all temporary resources from the target PostgreSQL database. This action is irreversible and should only be performed after migration is fully completed and the target schema is ready for production use.
The License Information panel on each project card displays:
- Source and target database types
- Estimated project data volume
- Licensed data usage (used and available GB) for that project
Each project in the list retains its last configured migration state (Running or Stopped) and continues processing in the background according to the status of its tables and consistency mode when the project was last accessed or closed.
The license key for each project is entered during project creation and is bound to that project.
Create a new project
All data migration operations are performed within projects.
To create a new project, click + Add New Project button on the Home page. The Project Creation page will then open.
On this page, enter the following information:
- Project name (required field). Enter a unique project name.
- Schema name field. Auto-filled schema name that will be created on the target database to store migration control tables and metadata. It is automatically removed when the project is deleted.
- Project summary optional field. Short summary of the project goals and scope.
After filling in the required fields, click Create Project button to continue. Upon successful field entry, the Target Database Setup page will open.
Use the Setup Checklist panel to guide you through the essential steps and pages required to launch your project.
Set up Target Database
On the Target Database Setup page, enter the connection details for the target PostgreSQL database:
- Host* field. The network address of the target database server where migrated data will be stored.
- Port* field. The TCP port number used to establish a connection to the target database server.
- Database Name* field. The name of the target database to which the data will be migrated.
- Root Username* field. The database user account with superuser privileges (typically the postgres user or another superuser). This account is used during project setup to install extensions, create the control schema, user mappings, and other migration infrastructure.
- Root Password* field. The password for the specified database user account.
Note: The target database must be created and available before the project starts.
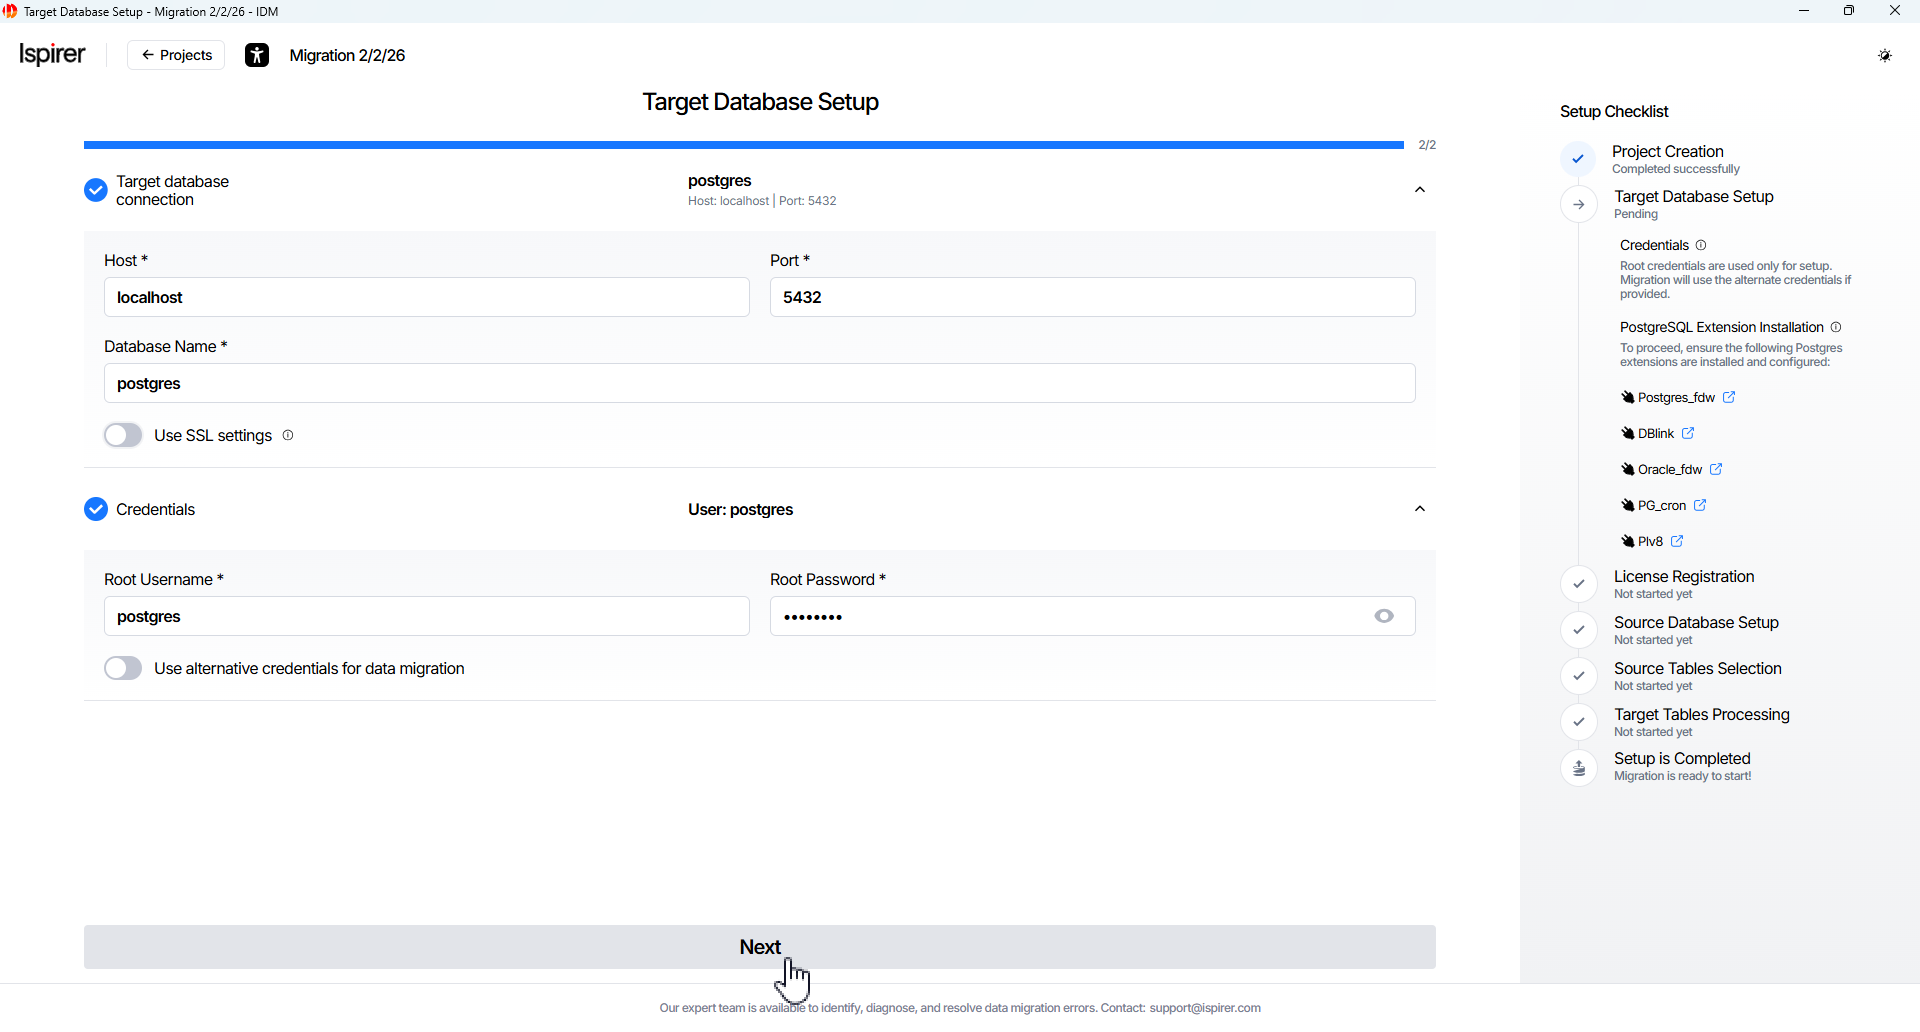
Important. Ensure the following utilities are installed and configured:
| Target Databases | Required target extensions must be installed manually by the superuser before setup |
| PostgreSQL RDBMS (version 14 and above) | Postgres_fdw DBlink Oracle_fdw PG_cron Plv8 |
After entering the details, click the Next button to continue. Once the fields are validated and the database connection is verified, the License Setup page opens.
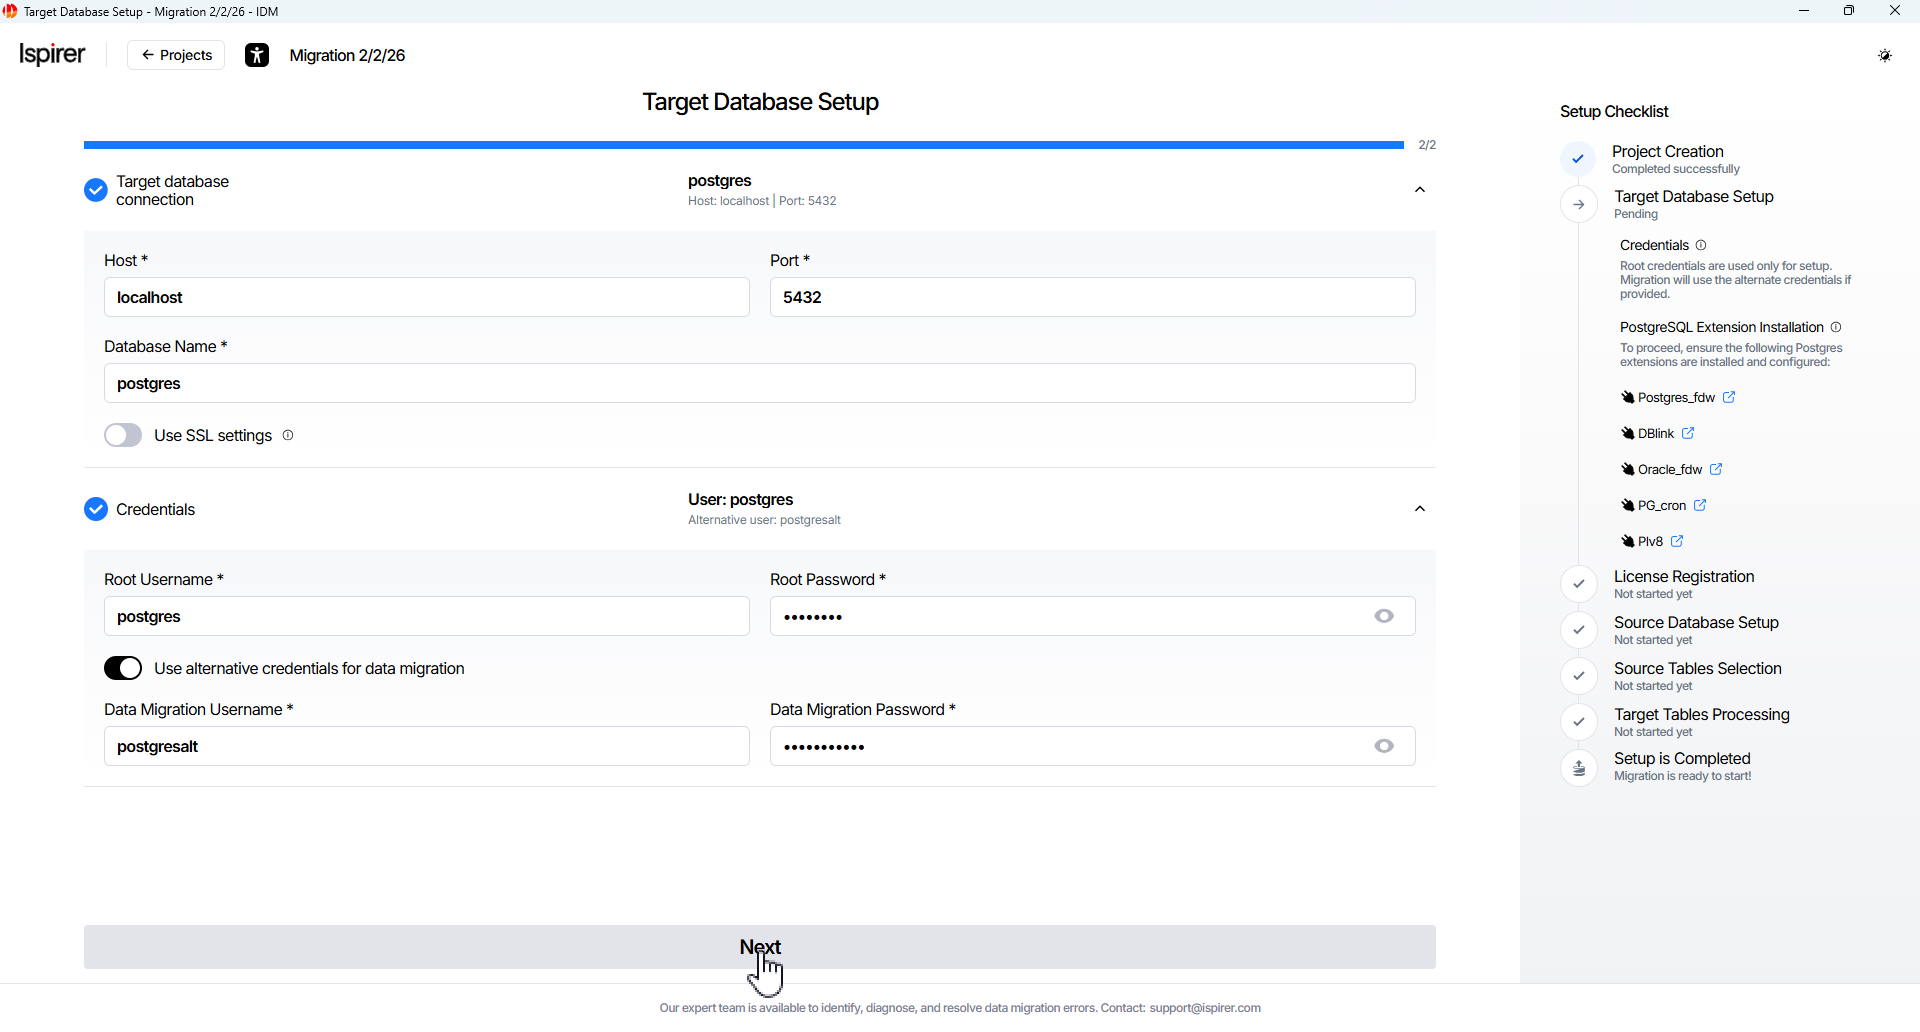
Note: All installation steps below should be executed as Postgres RDBMS superuser, formally known as Postgres. It is needed only for installation purposes, and further effective operation of the IDM solution does not require any redundant administrator privileges.
Alternative credential fields are for a migration-only user, allowing data migration with minimal privileges and without administrative configuration rights.
Note: If a connection error occurs:
- Double-check host, port, credentials, and network/firewall settings.
- Ensure the required extensions are installed (run CREATE EXTENSION commands as superuser if needed).
- Check that the target server is available and visible.
Contact support if the issue persists.
Set up your License
All data migration operations are performed within the license data usage limit.
License Registration
After you connect to the Target Database, the License Registration screen opens automatically.
By default, the system offers activation of an Online License. If no online license has been activated yet, you can switch to Offline License using the toggle on the screen. Once an online key is activated, this switch becomes disabled.
Online License Activation
Enter your license key in the corresponding field and click the Activate button. The license key is verified online (an active internet connection is required).
If the verification is successful, the License Details panel appears. It displays:
- Source and target database types
- Expiration date
- Maximum allowed project data volume
- Current licensed data usage (used and available GB)
Click Next to proceed to the Source Database Setup screen.

Offline License Registration
When you switch to offline mode, the License Registration screen changes slightly. The screen shows:
- LCN number field (non-editable) - automatically pre-filled by the system when connecting to the Target PostgreSQL database.
- License Key field - enter the license key provided by Ispirer.
After entering the key, click Activate.
 If validation is successful, the License Details panel appears (same information as for the online license).
At this point the switch to Offline mode is disabled, and the Remove and Next buttons become active. The activated offline key is permanently bound to the project - you will not be able to change it later.
Click Next to continue to the Source Database Setup screen.
Important notes for Offline licenses:
The LCN is collected automatically during connection to the Target Database. Do not change, recreate, or reinstall the target PostgreSQL database before activation. You can view the current LCN manually by running the following query in the target PostgreSQL database:
-- Query to get LCN (License Serial Number)
SELECT pg_current_wal_lsn();
Minor changes in the LSN value may occur over time - the system will still allow activation of the offline key.
Important Warning: If the target PostgreSQL server crashes or is reinstalled/recreated, the LSN number will change. In this case, the offline license becomes invalid. You will need to provide the new LSN to Ispirer. We will update the license and return the new offline license key so you can continue the migration process.
NOTE: Support for a reserved license key is available. You can add a backup key to your project to ensure seamless continuation of the migration process in case the primary license expires.
Also, you can book the demo and get the IDM demo license at www.ispirer.com/data-migration
Set up Source Database
On the Source Database Setup page, enter the following info:
- Service* field. The name of the database service or instance used to connect to the source database.
- Host* field. The network address of the source database server from which data will be migrated.
- Port* field. The port number used to connect to the source database server.
- Username* field. The database user account used to read data and capture changes from the source database.
- Password* field. The password for the specified database user account.
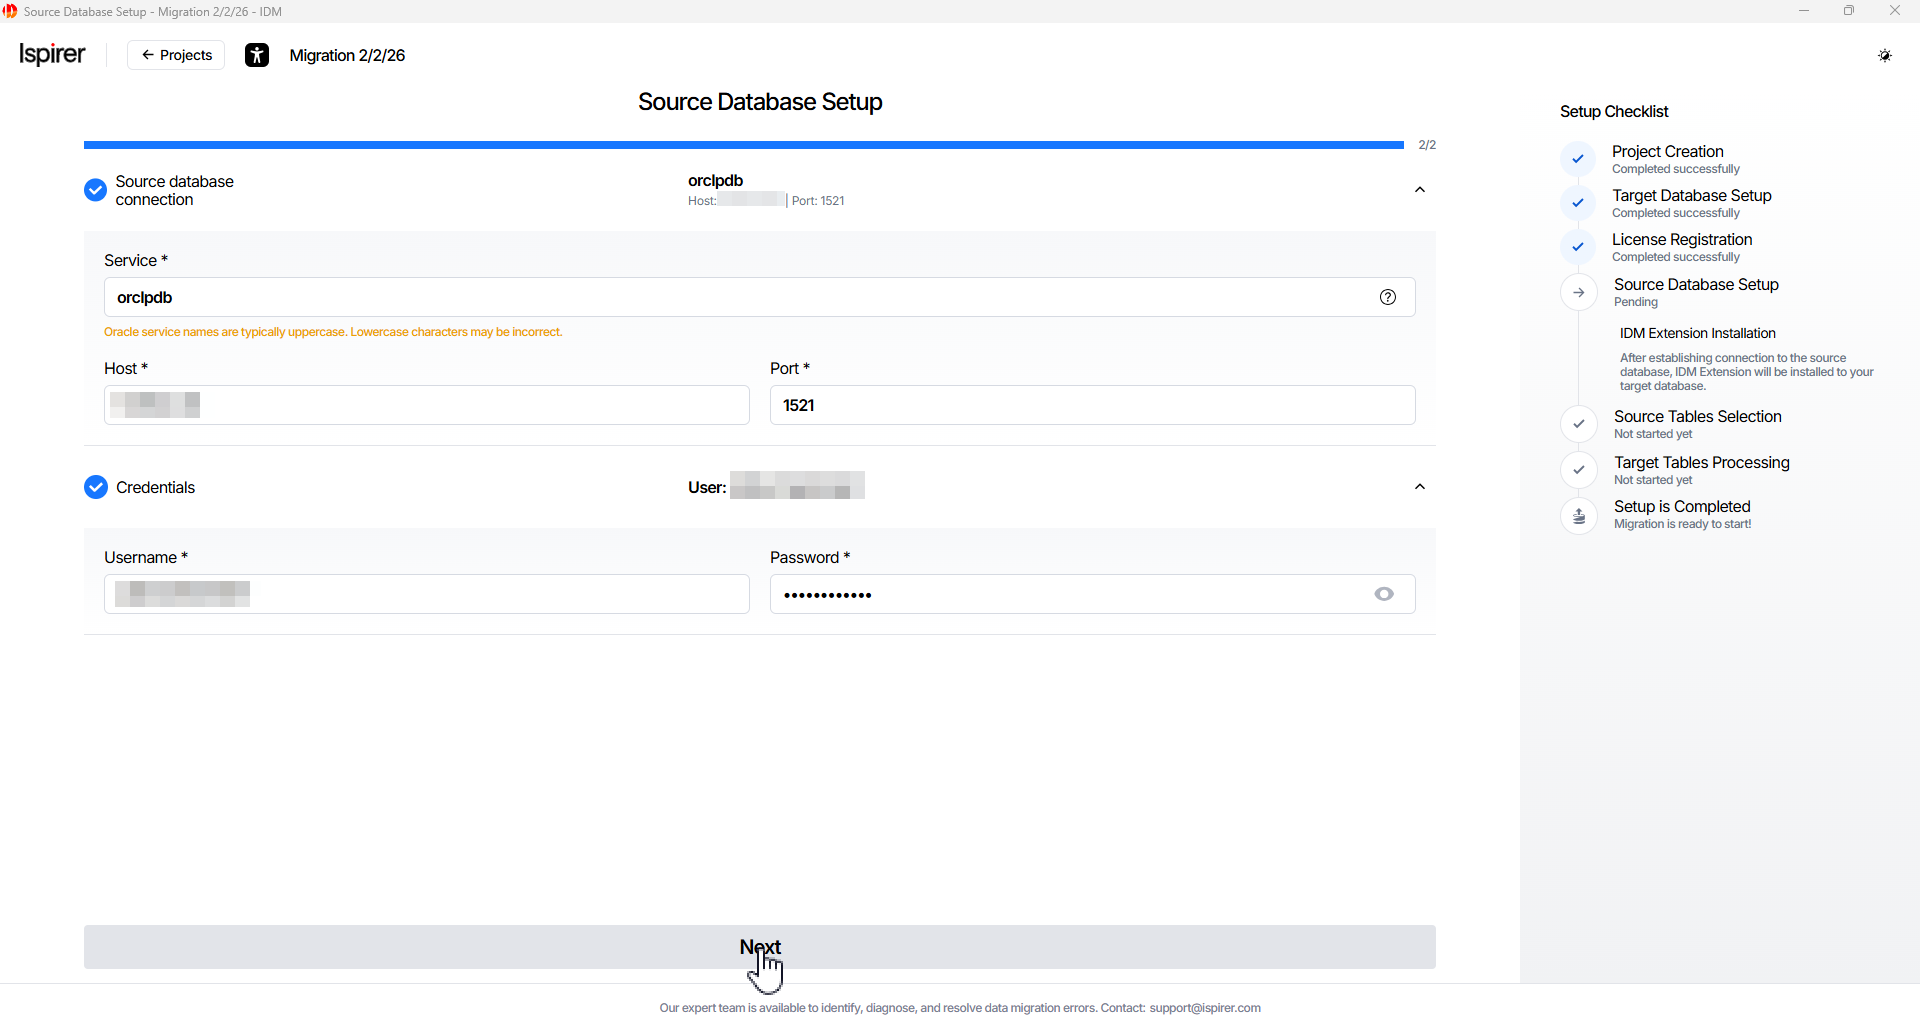
Click the Next button to continue. Upon successful field entry and Database Connection Verification, the Select Objects page will open.
If a connection error occurs:
- Verify host, port, service name, credentials, and network connectivity.
- Ensure the Oracle user has the minimum required privileges (see below).
- Confirm that TNS resolution works and the listener is running.
Contact support if the issue persists.
Note: When specifying the database username and password on this page, you need sufficient privileges to successfully execute SELECT statements on system tables of the source database.
Important. Ensure that the source database user privileges are properly configured.
Note: To connect to the source database, a dedicated database user with sufficient privileges is also required; the sections below describe the minimum required permissions and provide detailed instructions for configuring them if needed.
Select and Mapping Objects
Select Objects
A migration project is created empty and does not contain a list of objects for data migration.
On the Source Tables Selection page, the user needs to select which objects to include in the migration scope from the source database:
- Select objects checkbox from the object tree. Browse the object tree on the left side of the page.
- Expand schemas and select the desired tables (or entire schemas).
- Check the box next to each table/schema you want to migrate.
- To exclude an object, simply uncheck its box
- Clear checkbox. To remove an object from the selected list if needed.
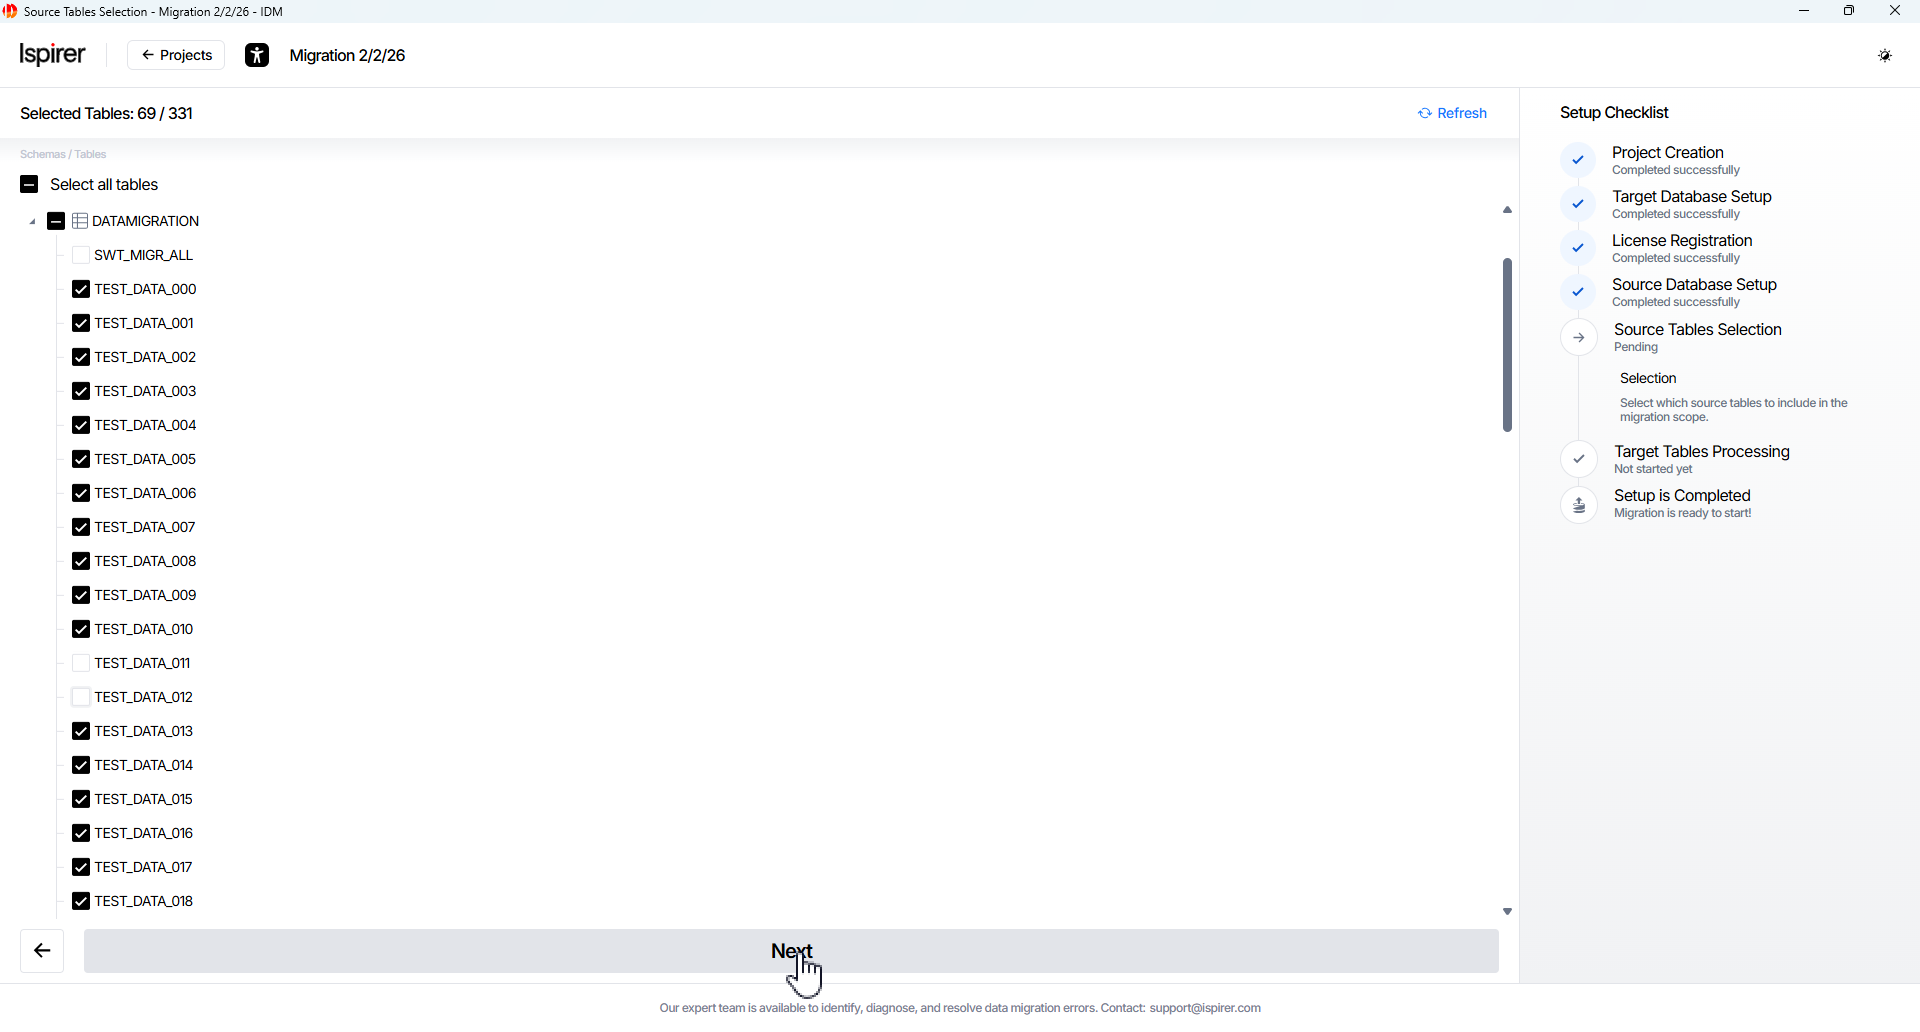
Click Next button to continue. Upon successful entry, the Target Tables Processing page will open.
Mapping
On the Source Tables Selection page, you can also configure mapping settings.
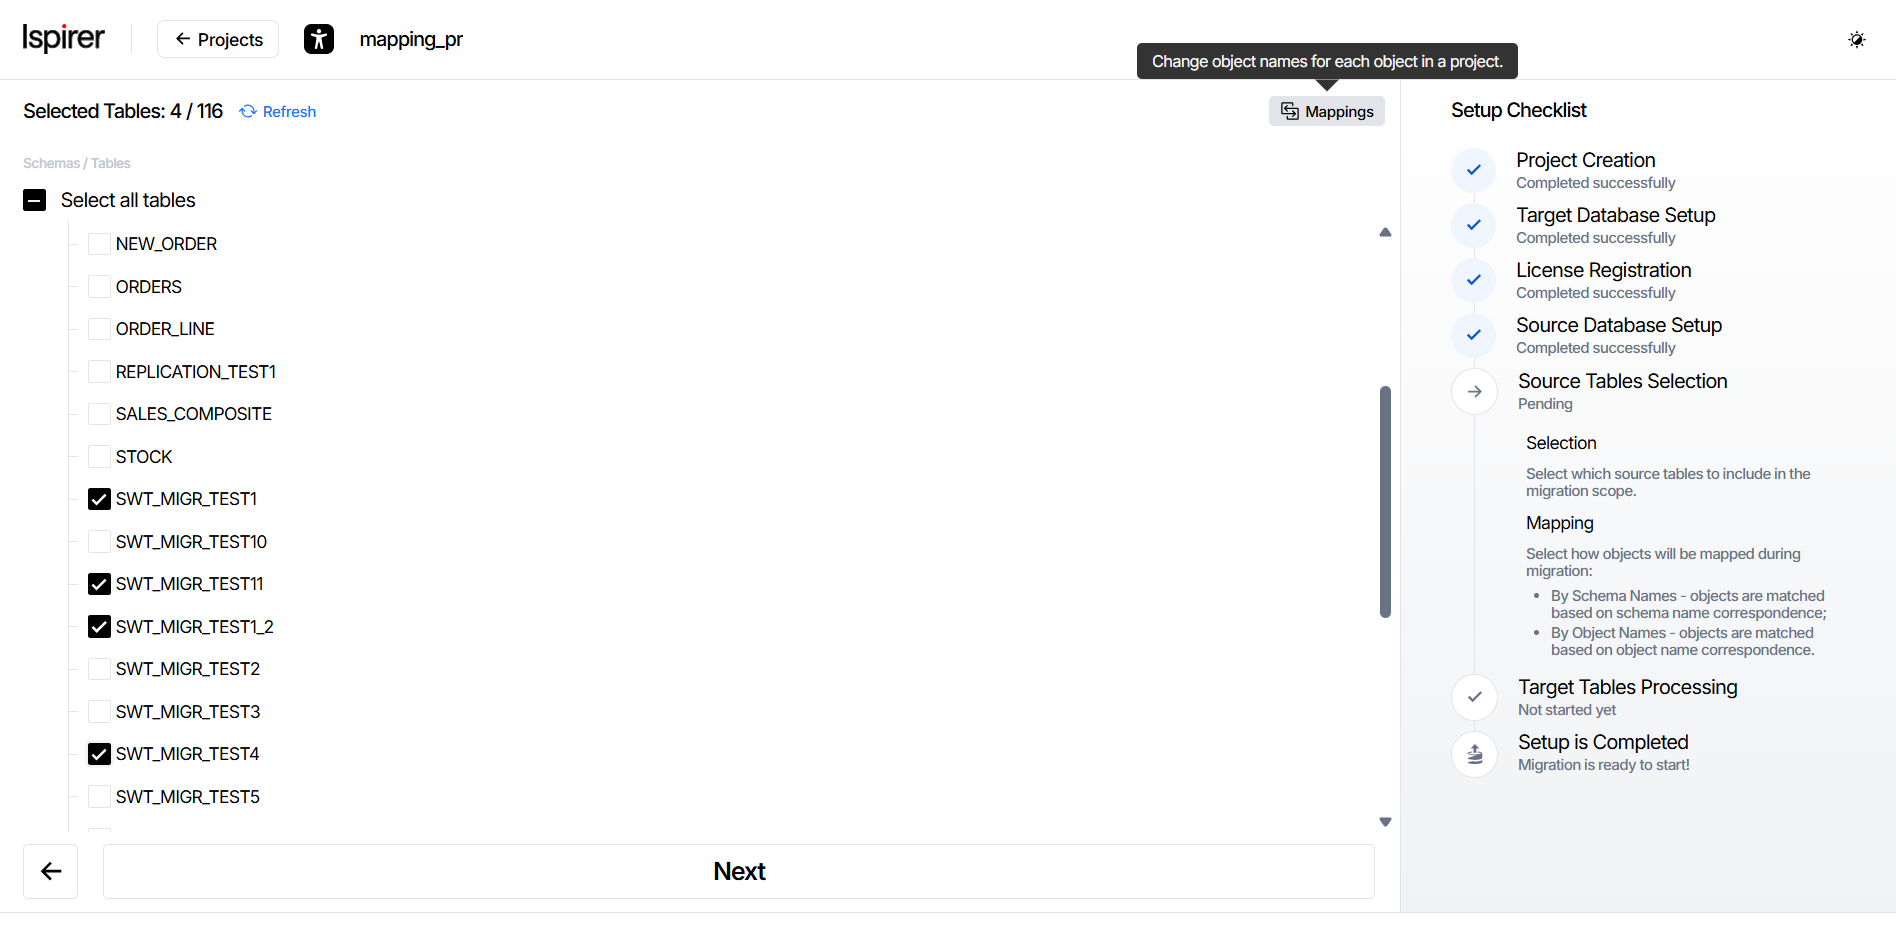
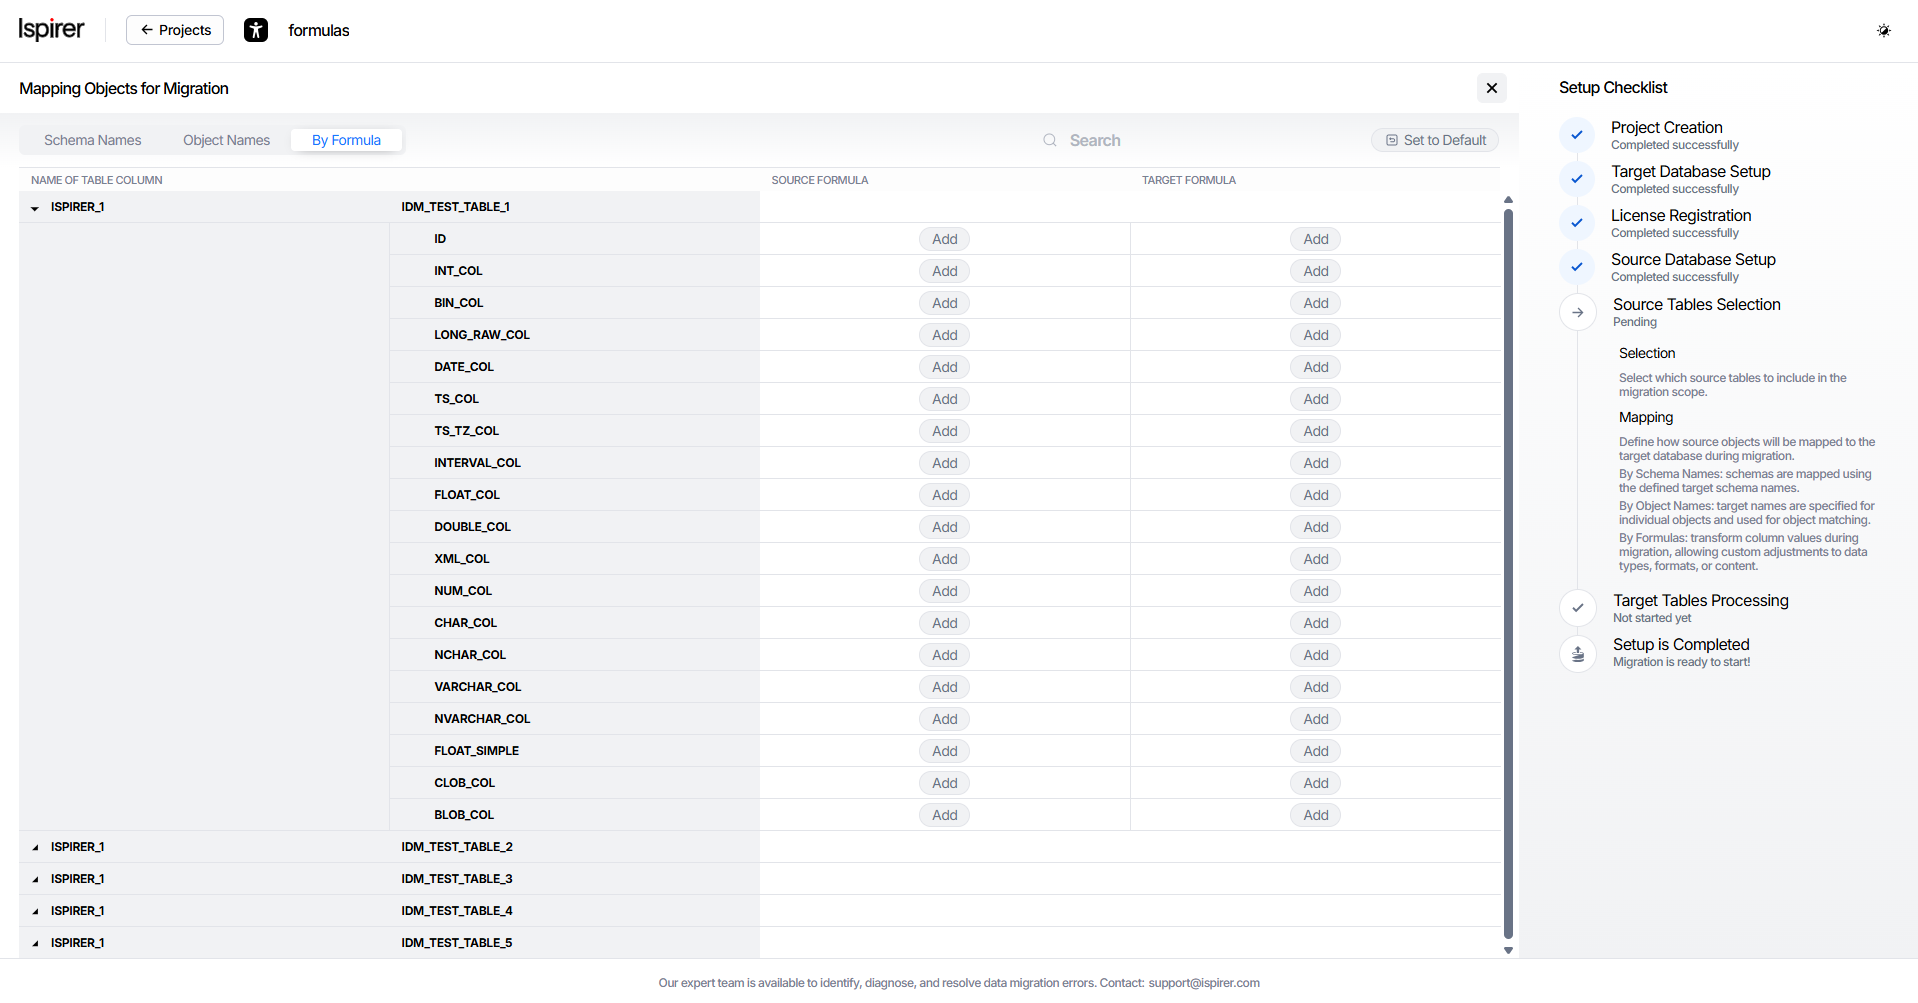
Mapping defines how source objects are mapped to the target database during migration. To open the mapping configuration screen, click the Mapping button. Upon successful entry, the Mapping Objects for Migration page will open.
To open the Mapping Objects for Migration page, at least one object must be selected.
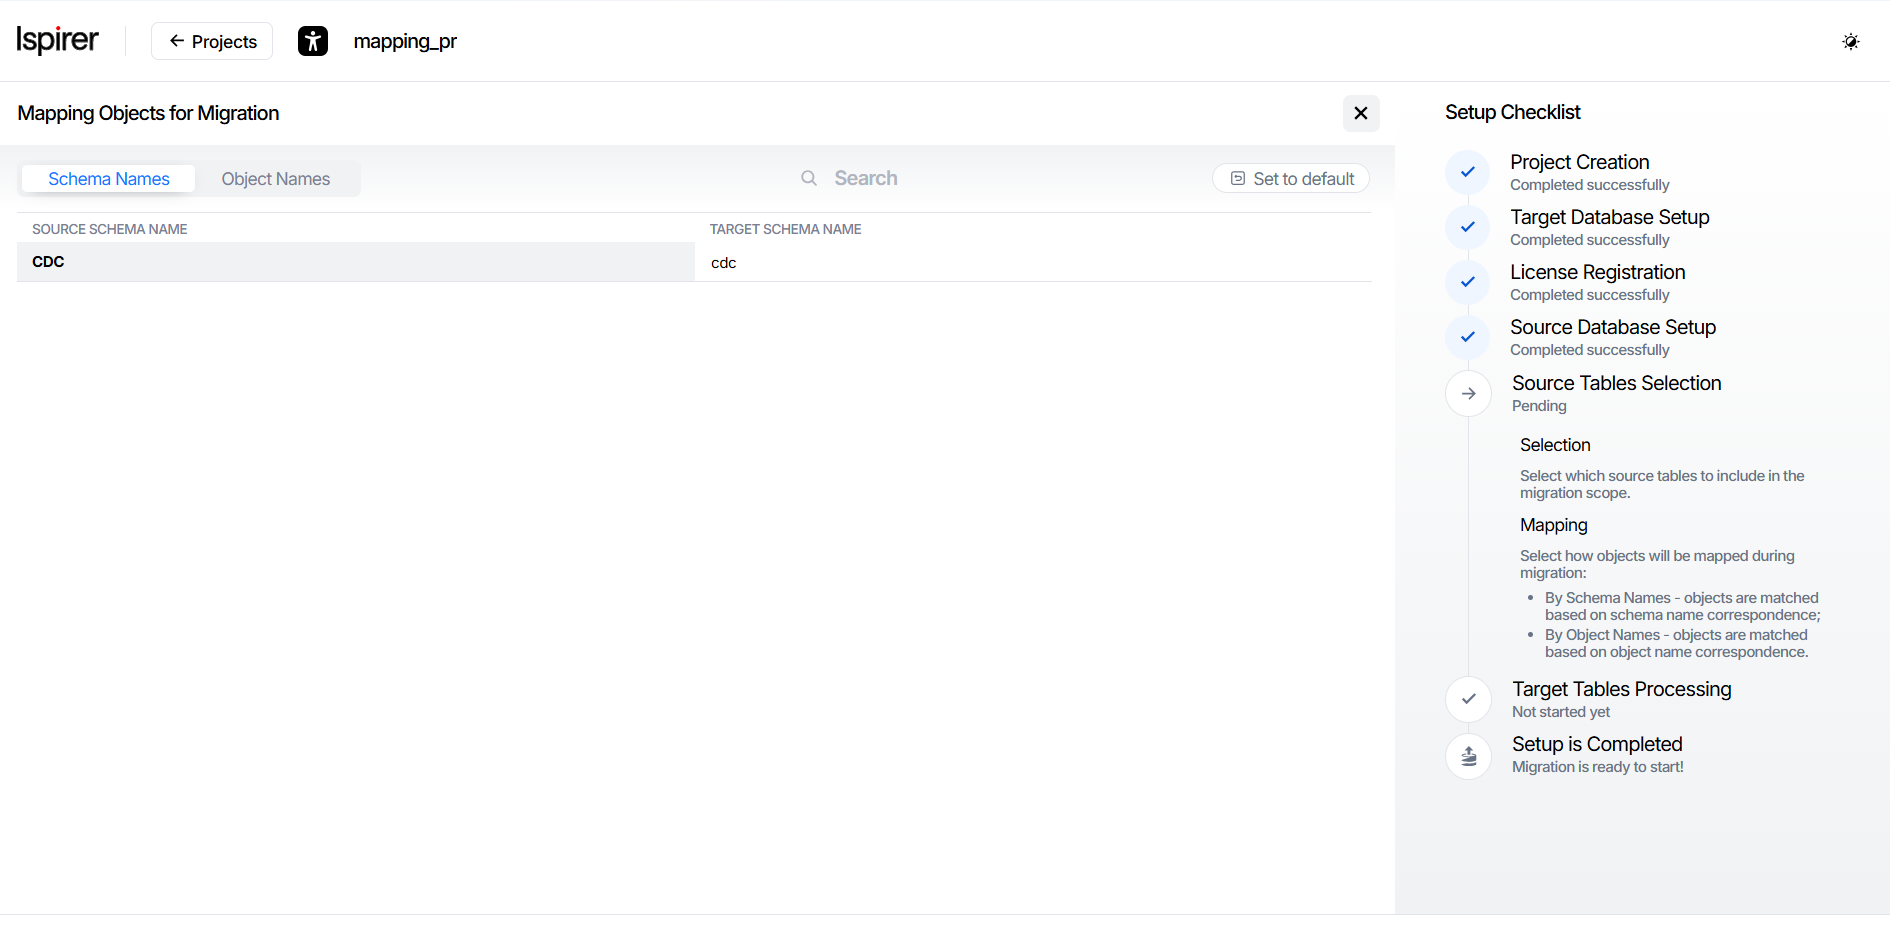
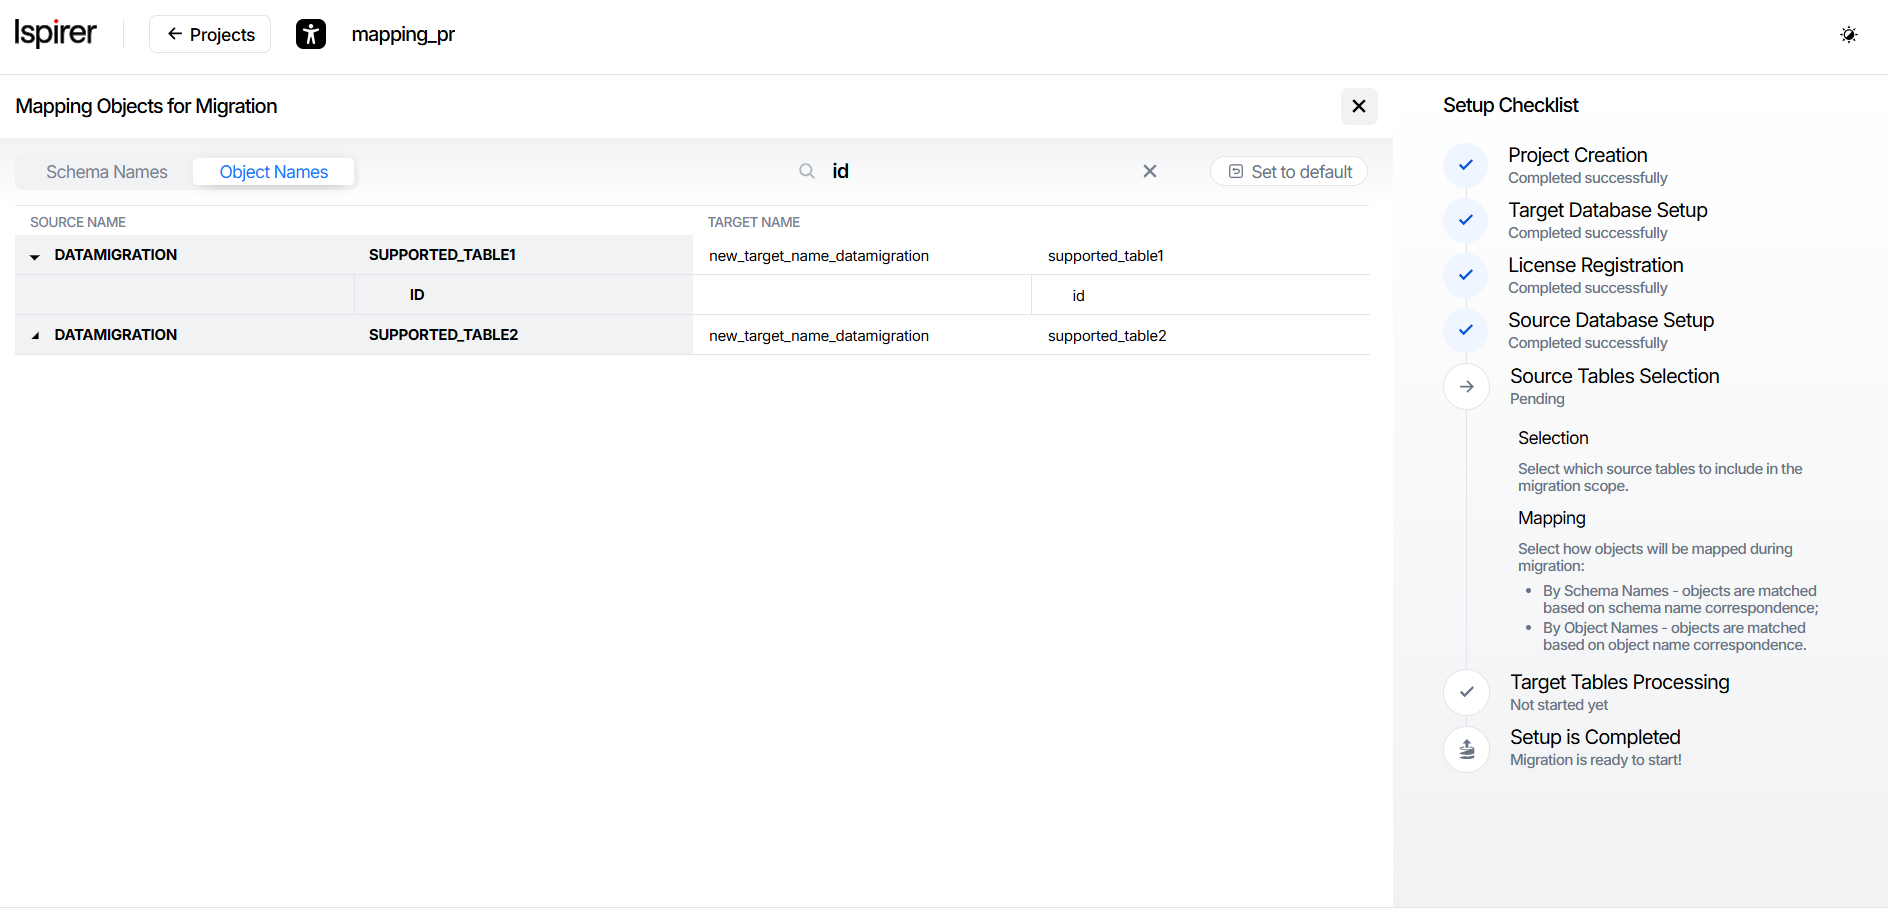
The page contains two tabs:
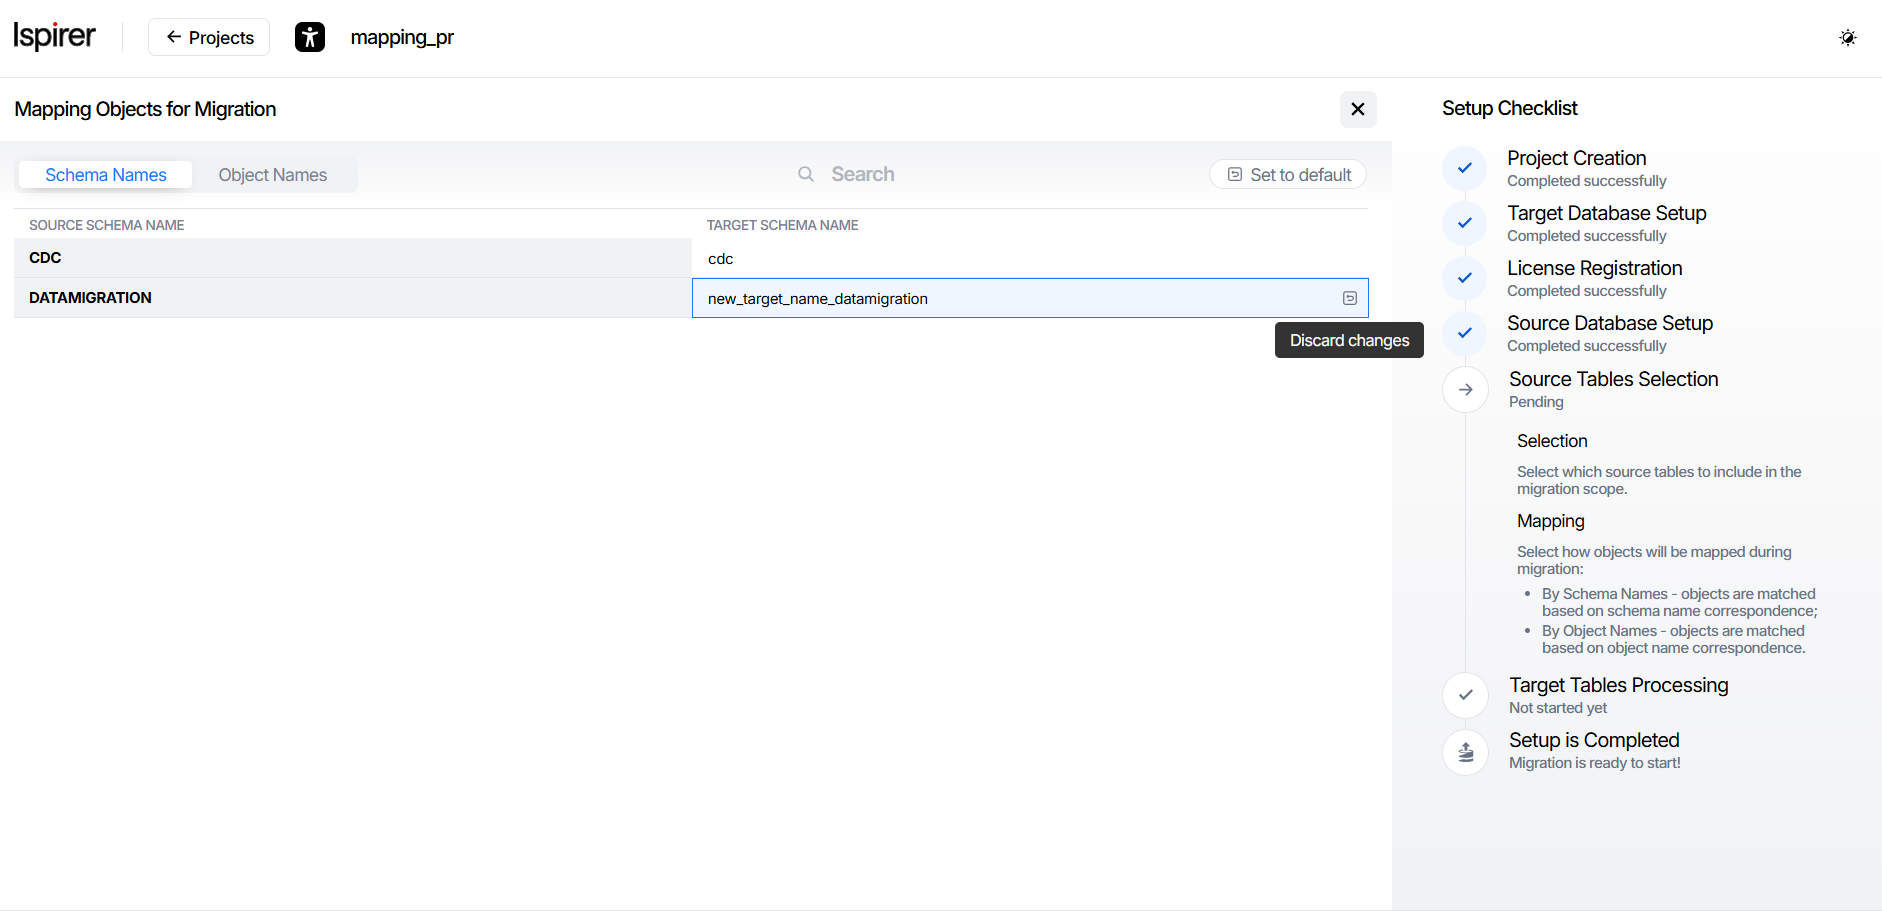
- By Schema Names - schemas are mapped using the defined target schema names.
- By Object Names - target names are specified for individual objects and used for object matching.
- By Formula - custom conversion formulas for individual columns.
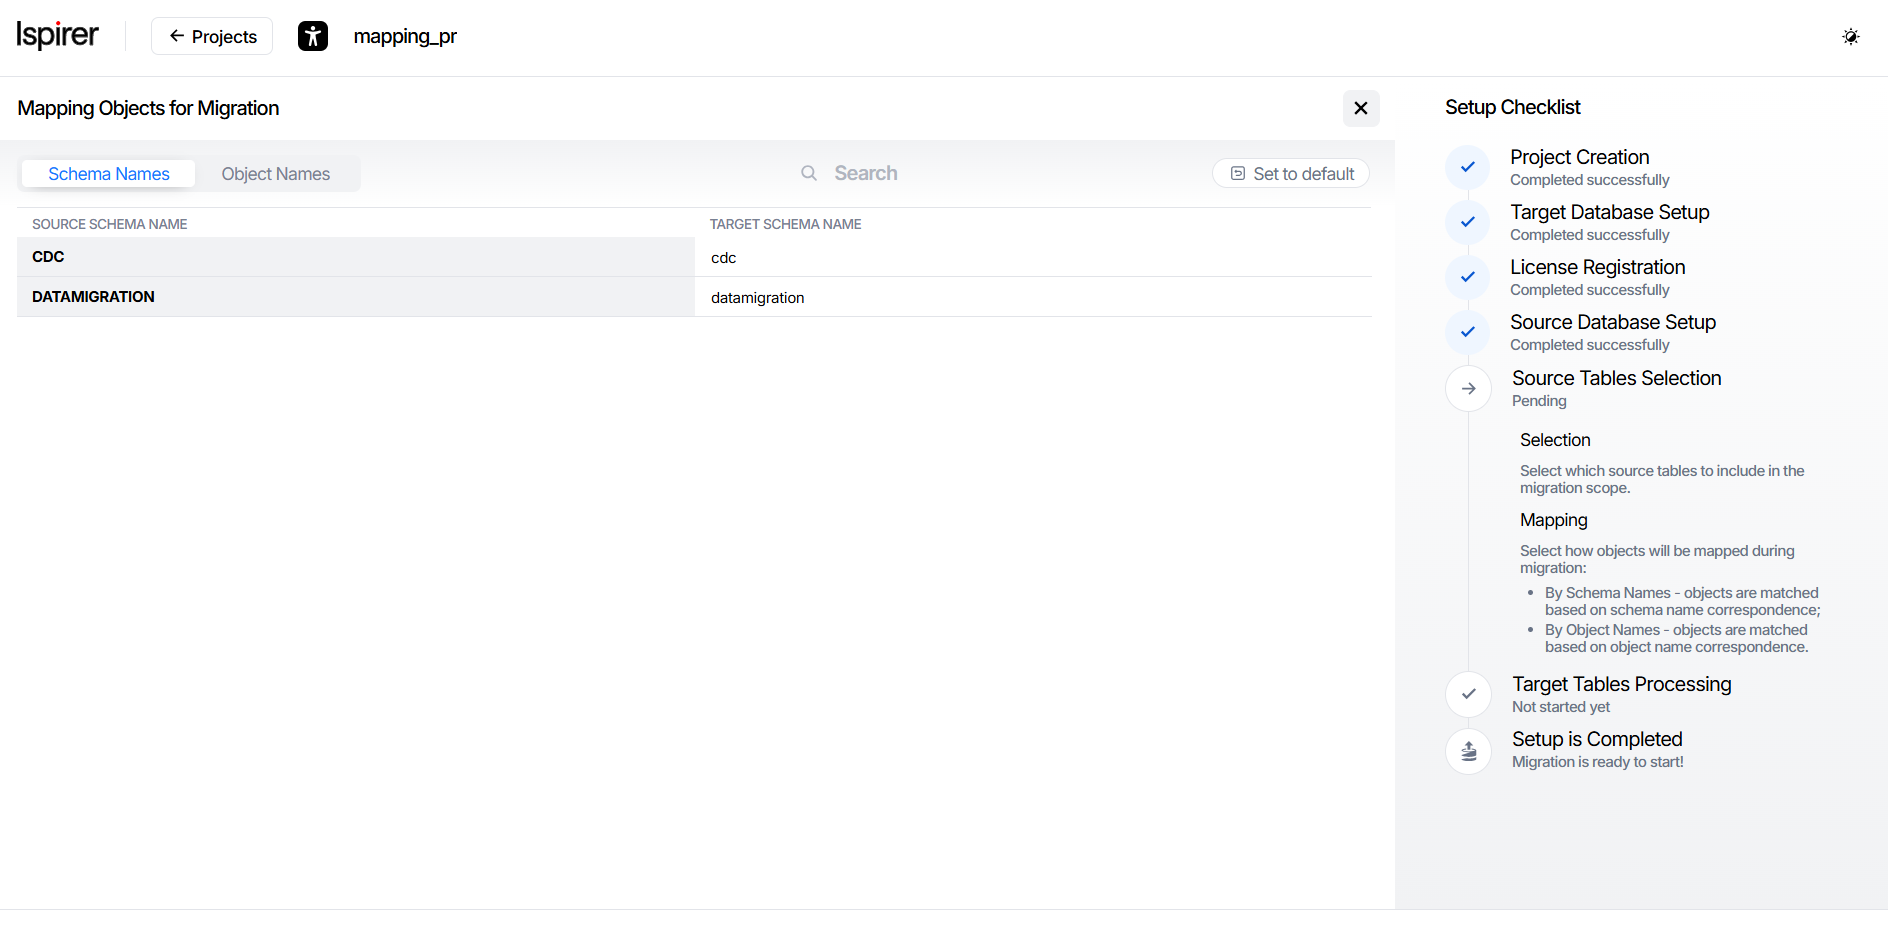
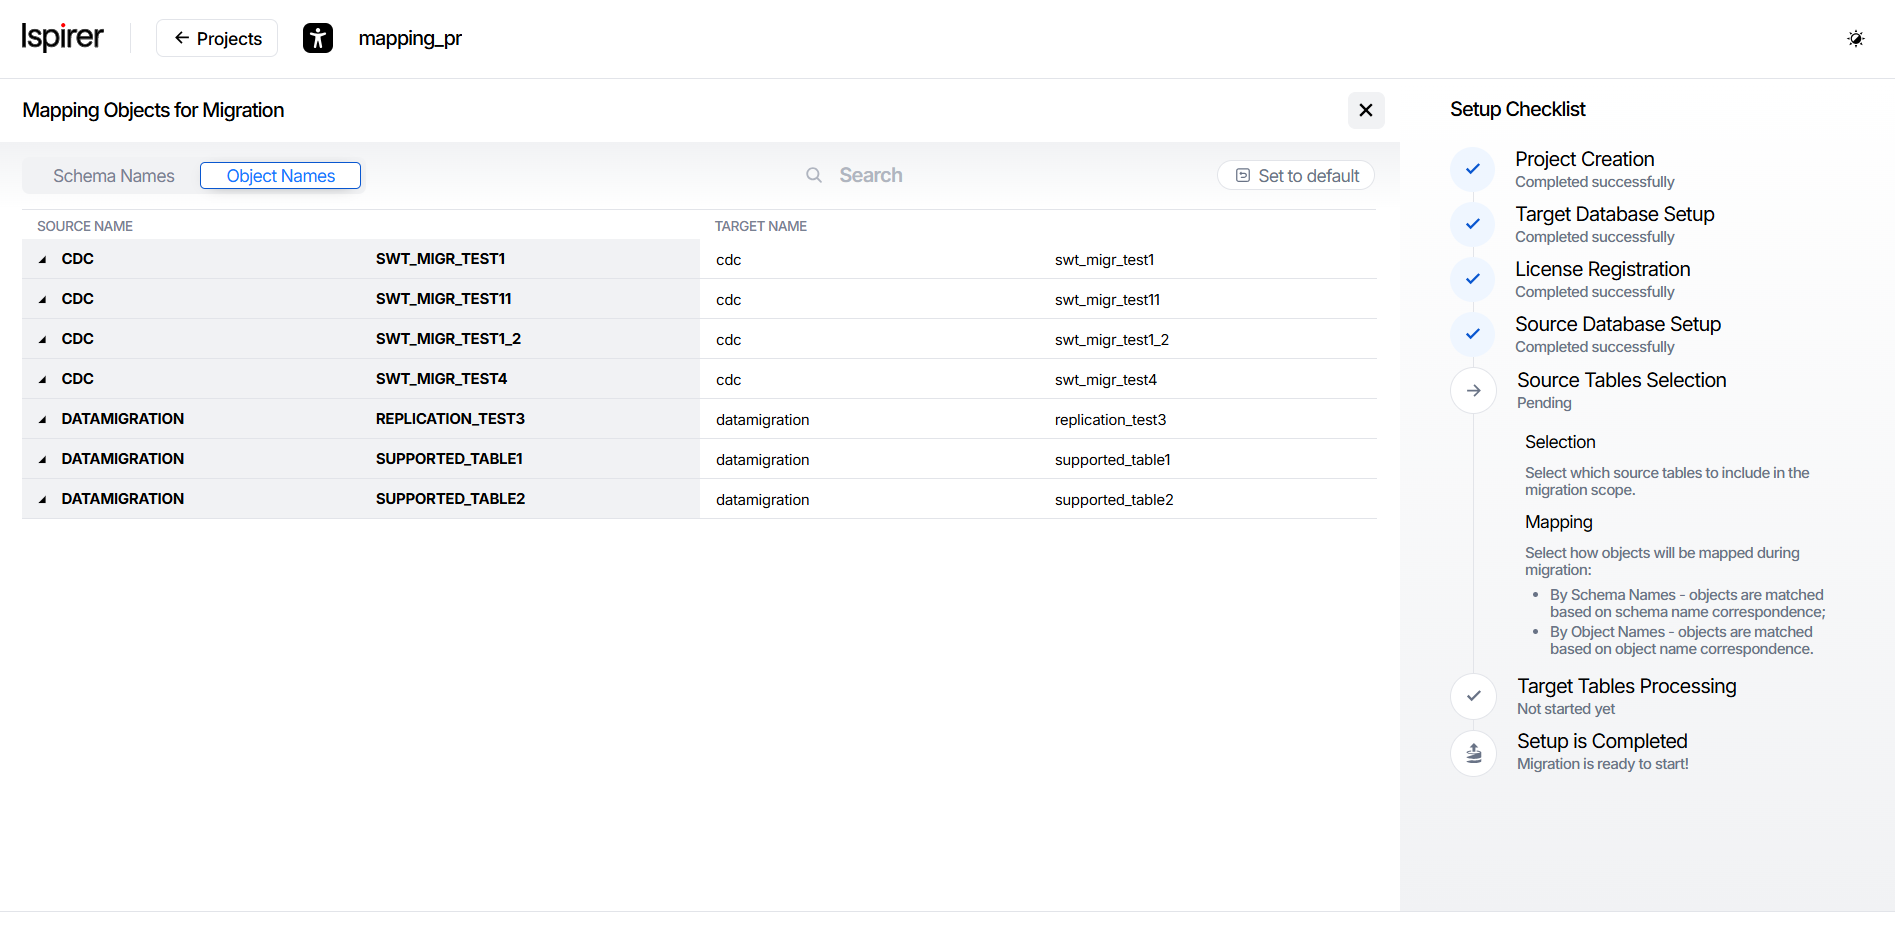
These options allow you to assign target object names that differ from those in the source database. By default, target names are automatically populated using the corresponding source object names.
At this stage, you define the names of objects in the target database. The creation and validation of target objects will be performed on the next setup screens.
On the following pages, the project object tree will be displayed using the target database object names.
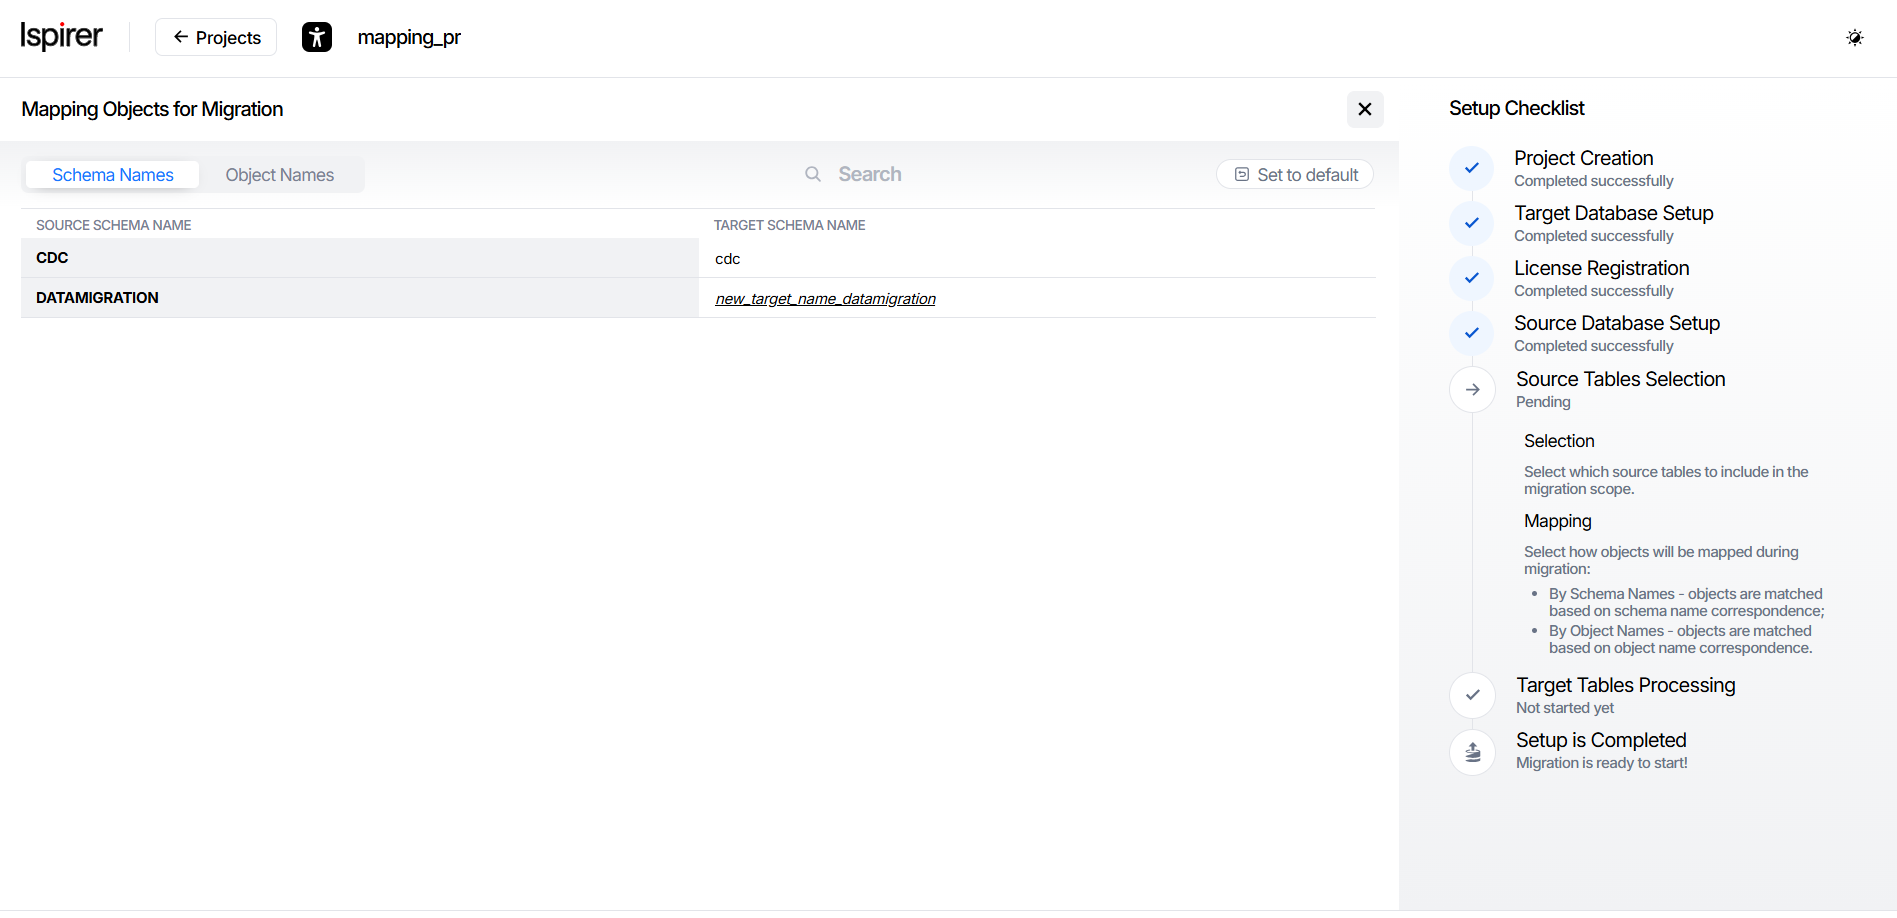
To assign a new name to an object, enter it in the input field under the Target Schema Names or Target Name section, replacing the auto-filled value. The new name will be displayed in italic and underlined.
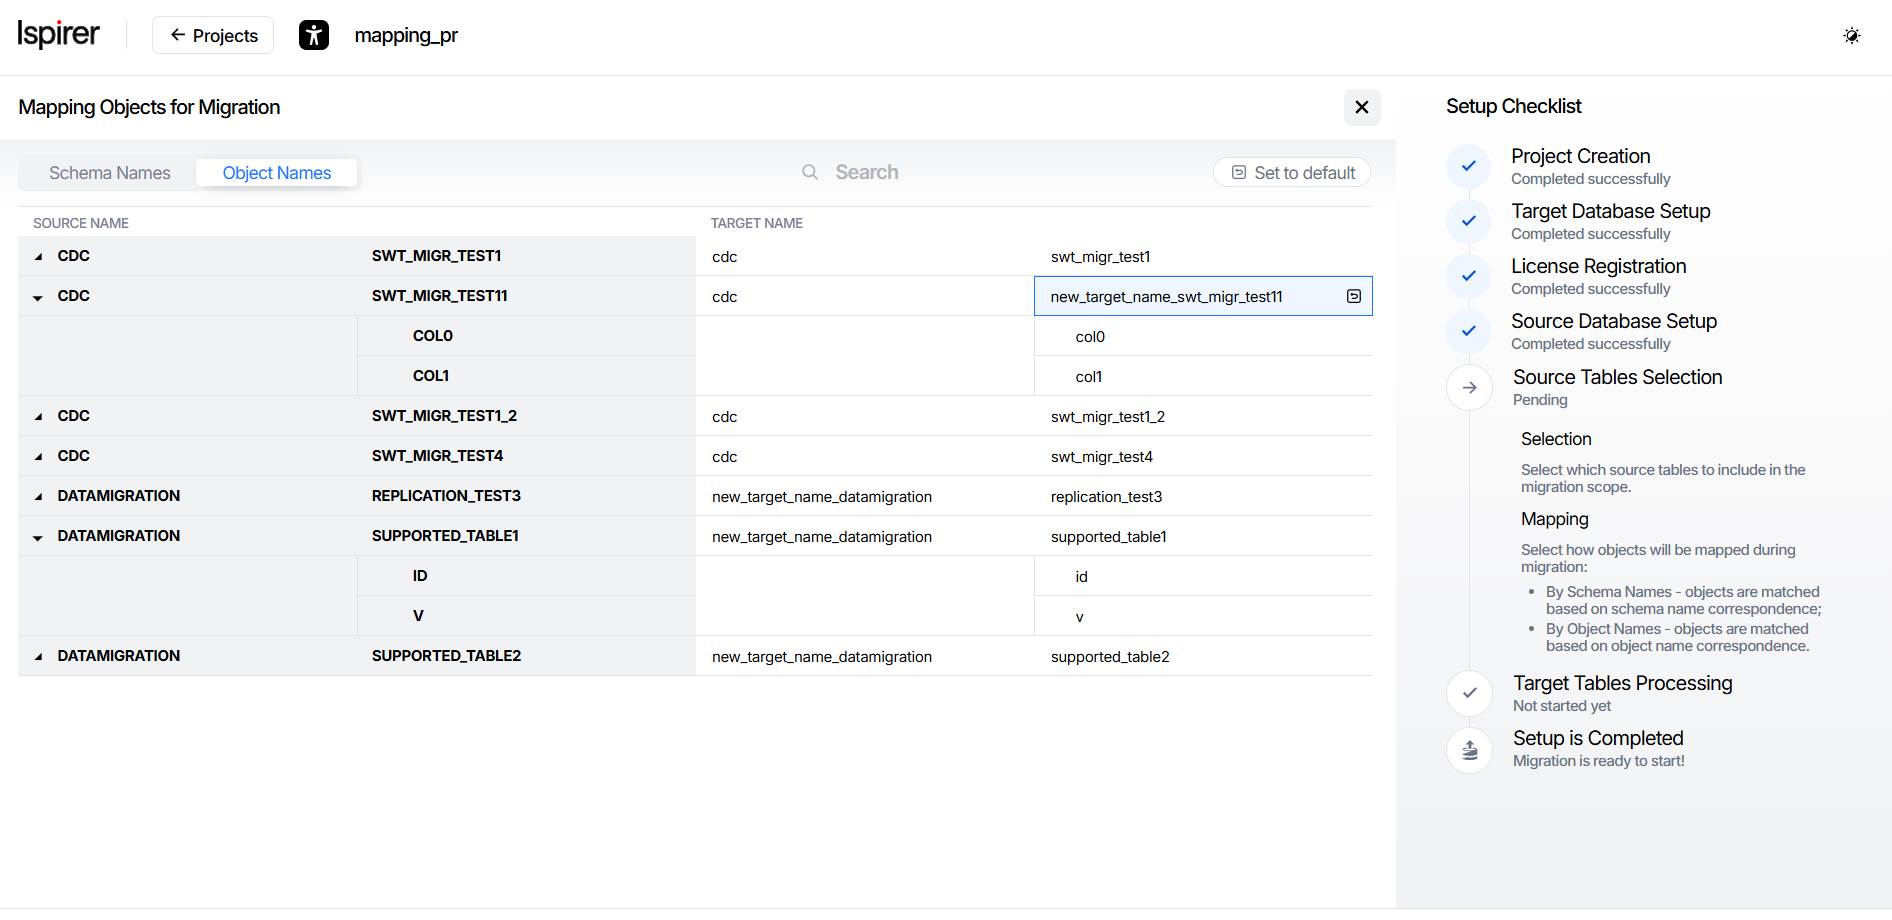
You can use live search (search-as-you-type) to quickly find project objects by name (schema, table, or column). The search results are updated automatically as you type.
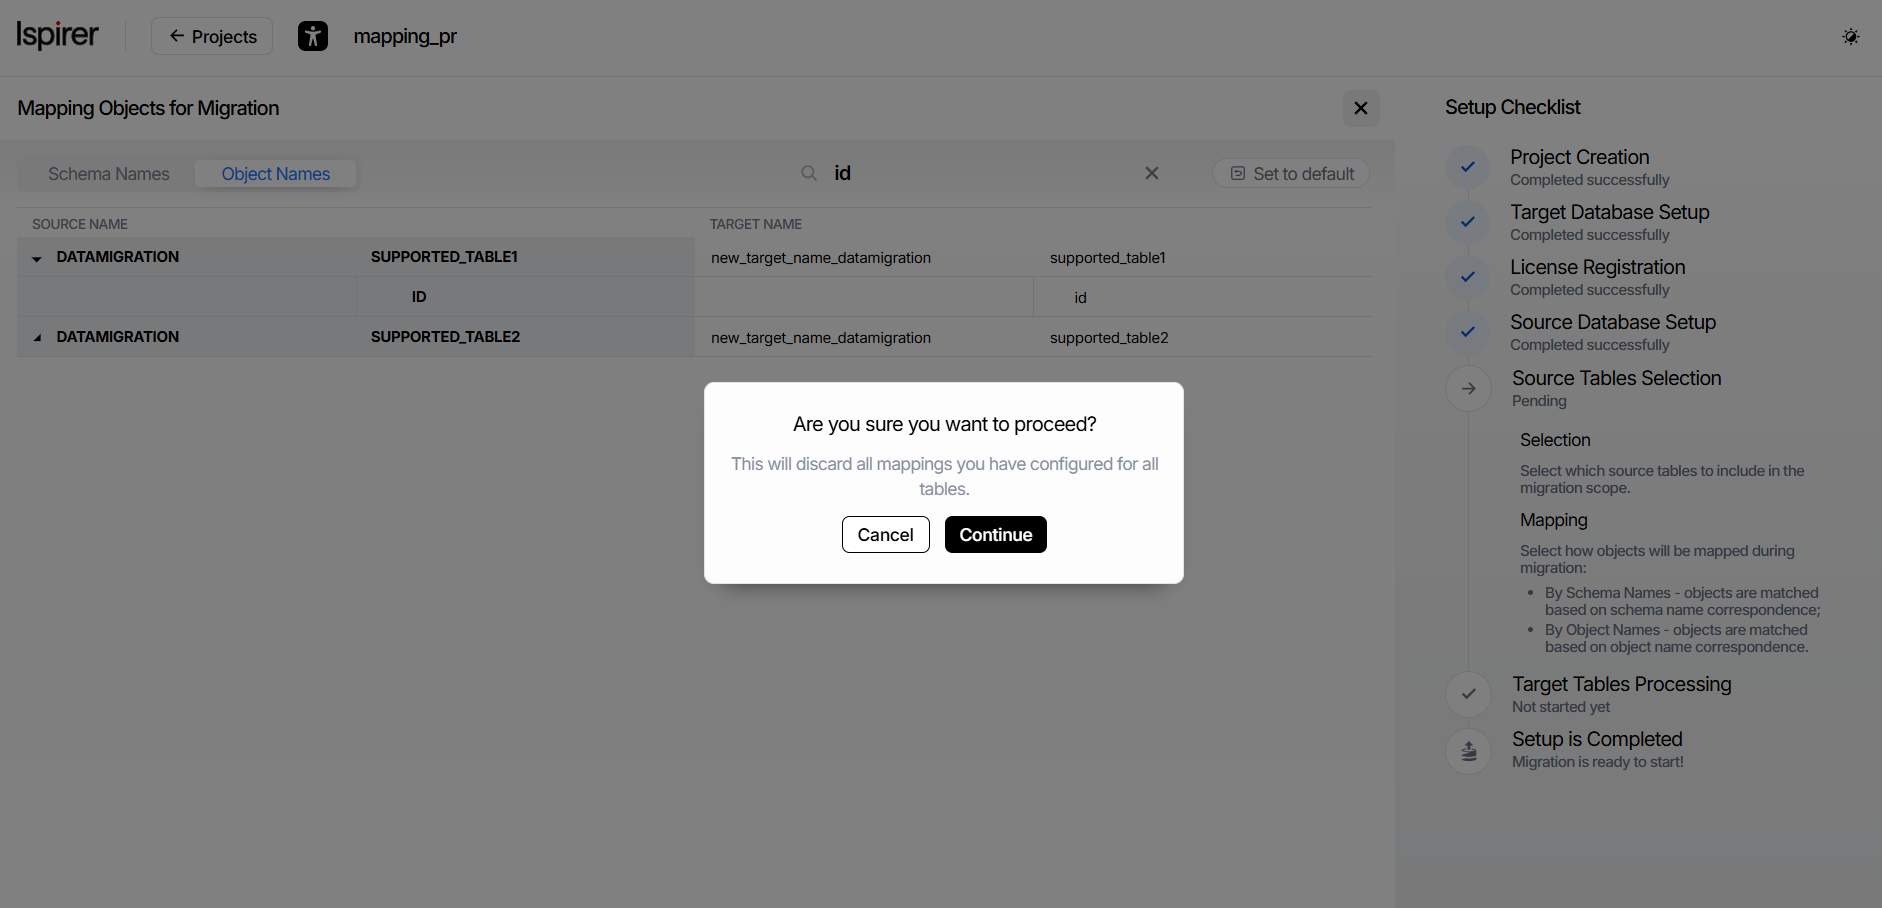
You can revert custom object names and return to the default auto-filled names (matching the source database object names) using the following controls:
- Set to Default button — resets names for the entire project.
- Discard Changes badge — resets the name for an individual object in the input field.
When entering new names for target database objects, you may encounter two types of errors:
- Duplicate names — duplicate names have been assigned to related objects. To resolve this error, enter a different name in one of the input fields highlighted in red.
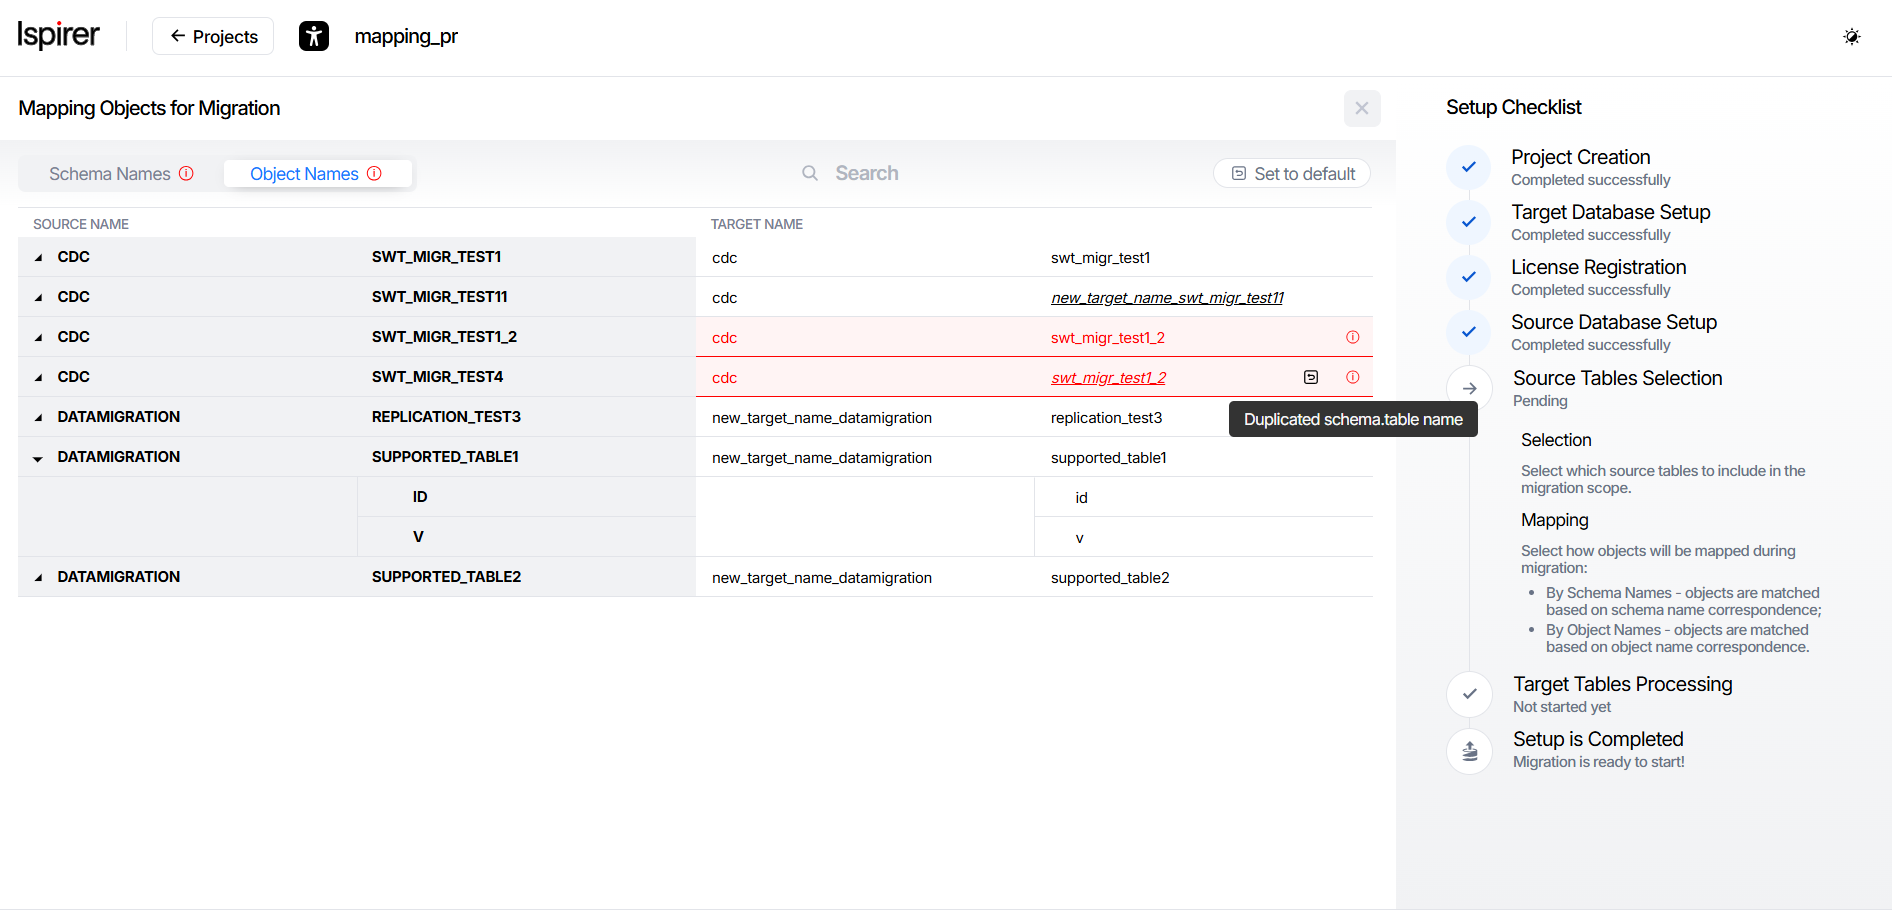
- Name length limit exceeded — the total length of object names exceeds the limit. To resolve this error, enter a shorter name in one of the input fields highlighted in red.
Important. Until the error is resolved, leaving the mapping configuration page is blocked, as these types of errors prevent objects from being added to the migration project. A simple way to fix them is to use the Discard Changes badge in the input field to revert to the default name.
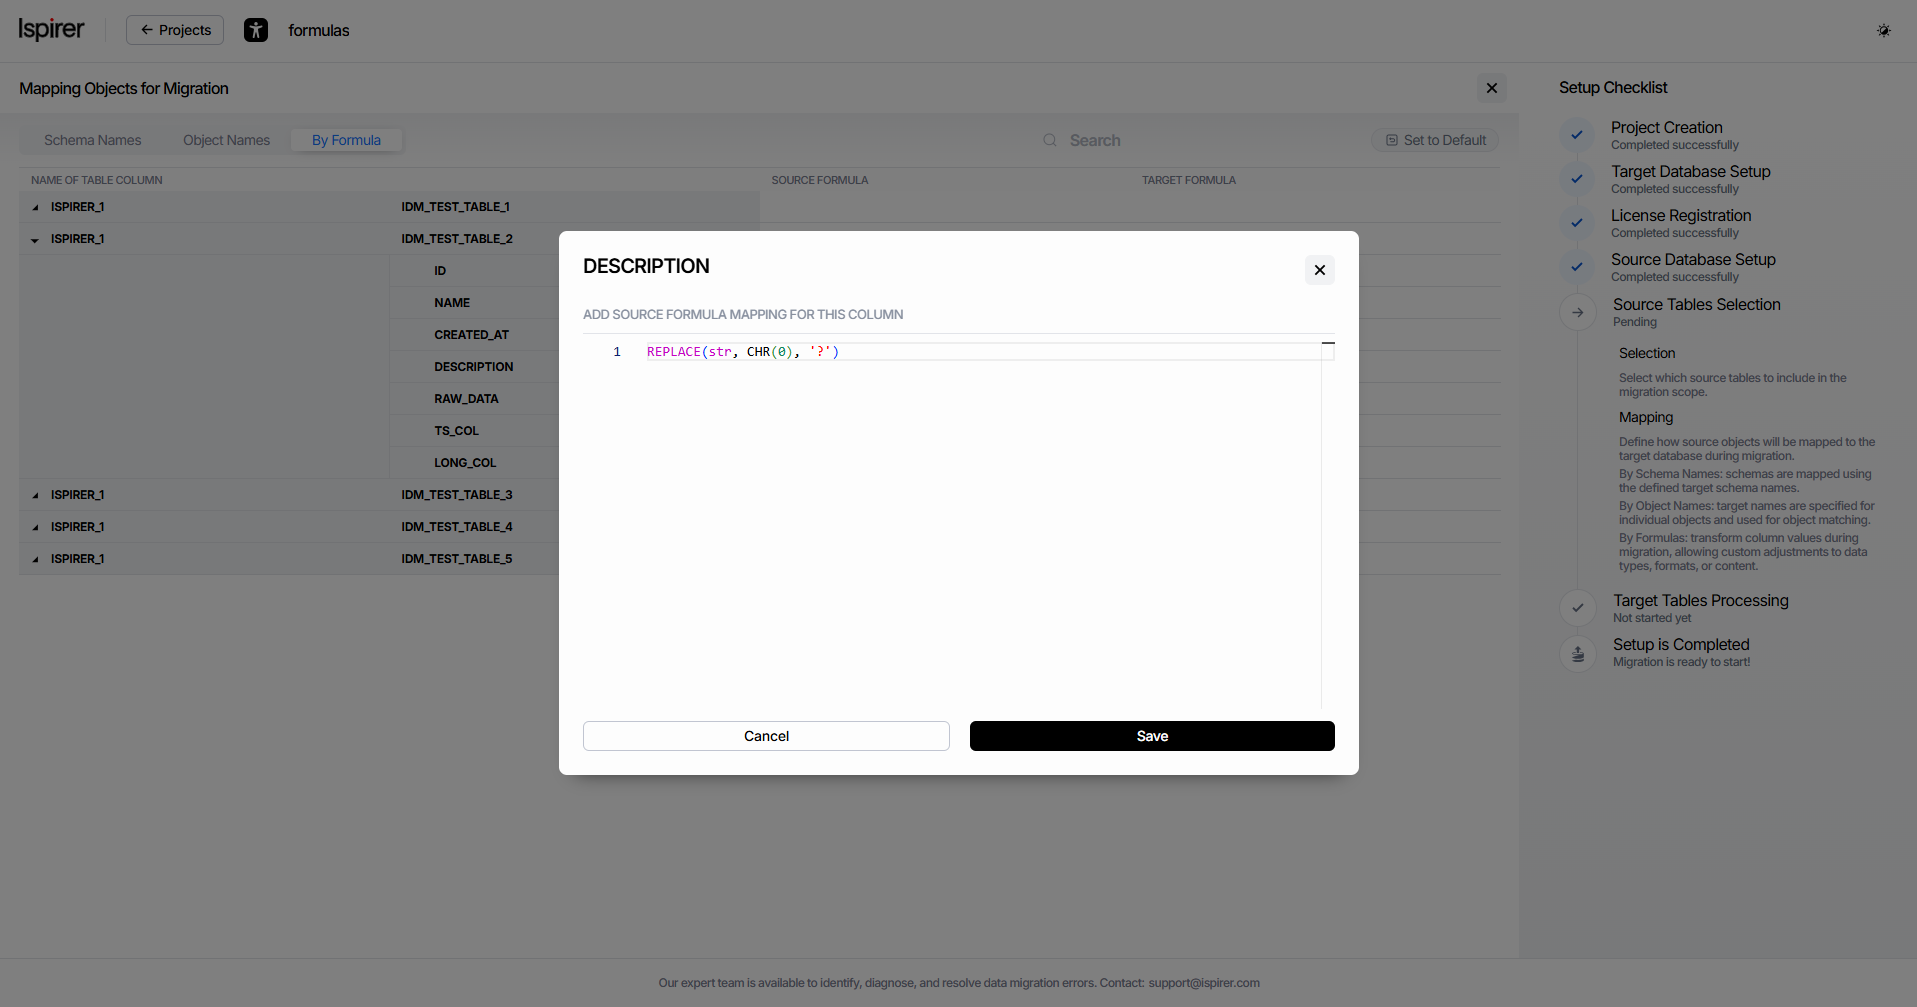
Formula mapping tab allows you to define custom conversion formulas for any column to handle complex data transformations between Oracle and PostgreSQL. The left side shows a hierarchical tree: Schema > Table > Columns. For each column you will see three fields:
- Column Name;
- Source Formula - Oracle SQL expression applied on the source side (before data is transferred);
- Target Formula - PostgreSQL SQL expression applied on the target side (before insertion).
After completing the mapping configuration, you can return to the Source Tables Selection page by clicking the Close (×) icon.
There, you can further add or remove objects from the project (as you did earlier) and continue configuring mappings for the updated migration scope.
Once you finish selecting objects and configuring their mappings, click Next to proceed to the next project setup stage - creating and validating target objects (the Target Tables Processing page).

Important: After moving to the next step, you will no longer be able to return to the Source Tables Selection and Mapping stage.
Validate Objects
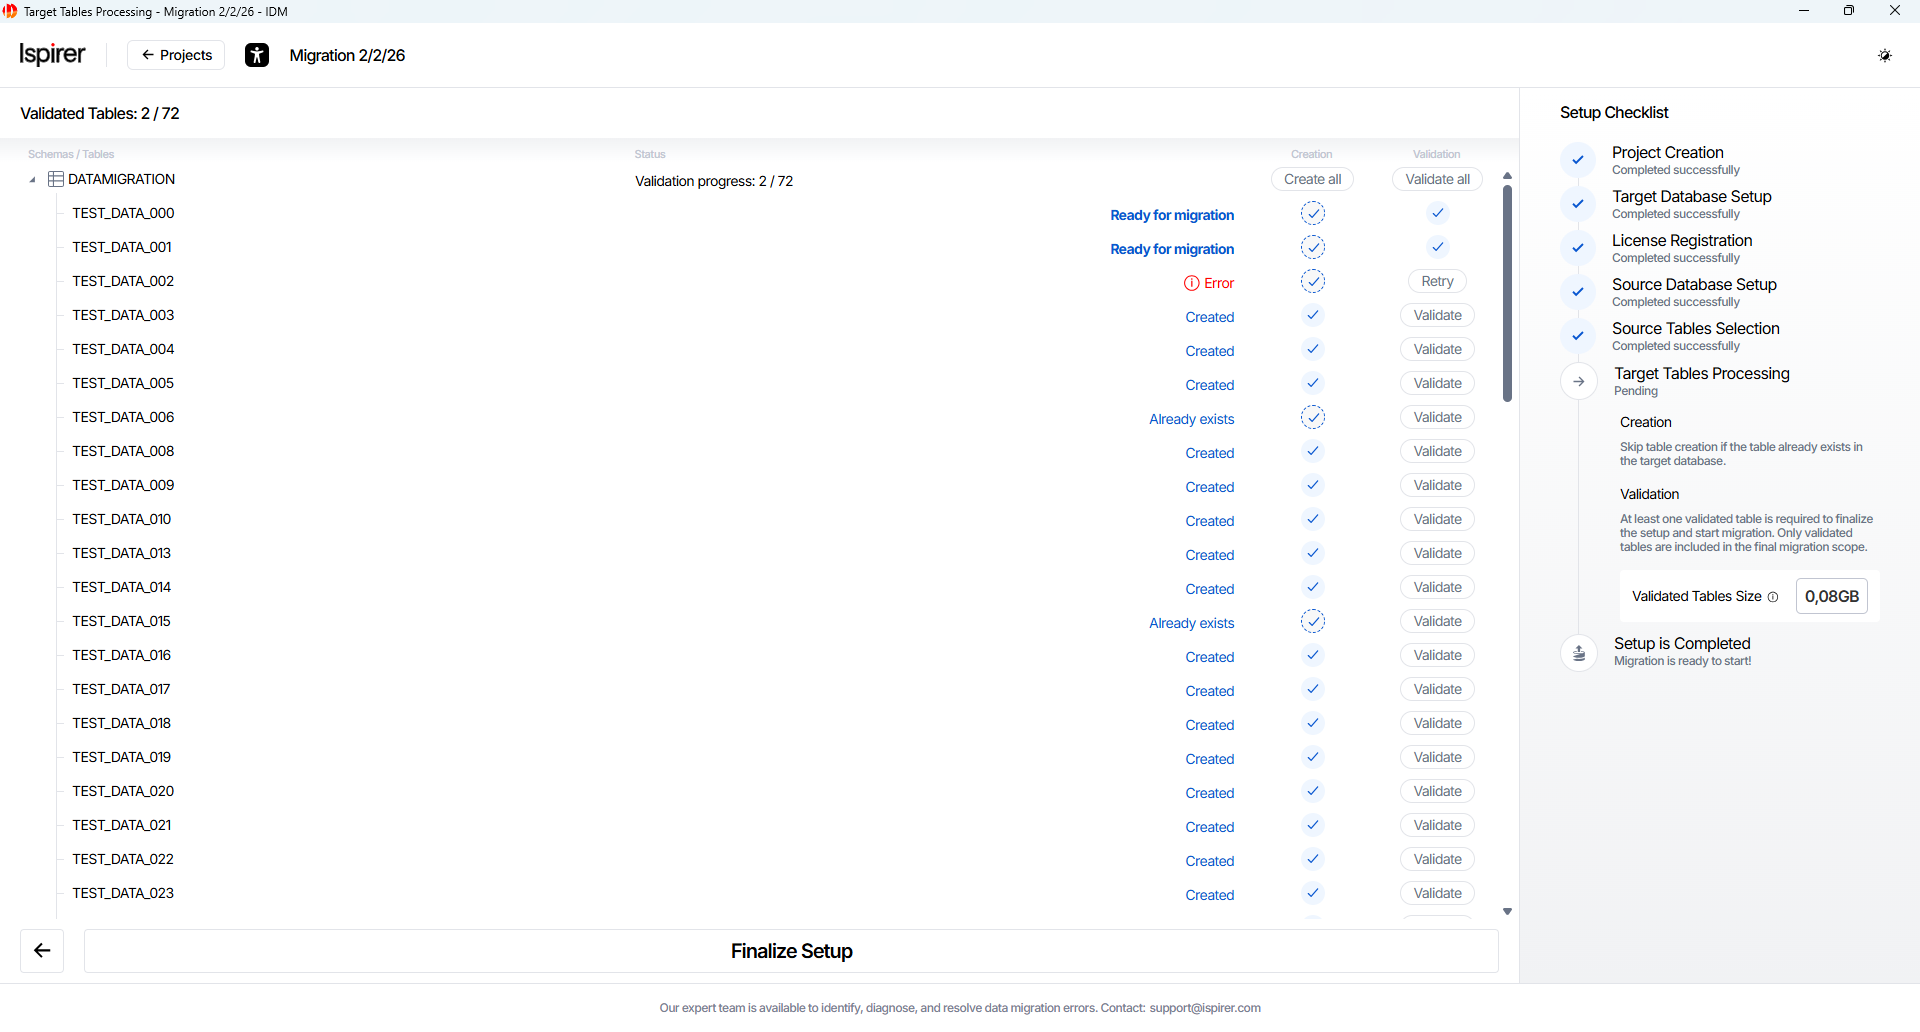
On the Target Tables Processing page, configure and verify the target-side structures for the selected source tables. This step ensures that target tables exist (or are created), column mappings are correct, data types are compatible, and everything is ready for data migration.
Available actions (buttons per schema or per table):
- Create button. Automatically creates the target schemas (if missing) and target tables for all selected source objects. Tables are created empty, without constraints, without indexes, and with triggers disabled – this is the standard preparation state for migration
- Validate button. Runs compatibility and mapping validation on the created (or existing) target tables. Validation checks:
- Correct mapping of source-to-target columns
- Supported data types
- No critical conflicts (e.g., unsupported types without custom formulas)
- Readiness for adoption into the migration process
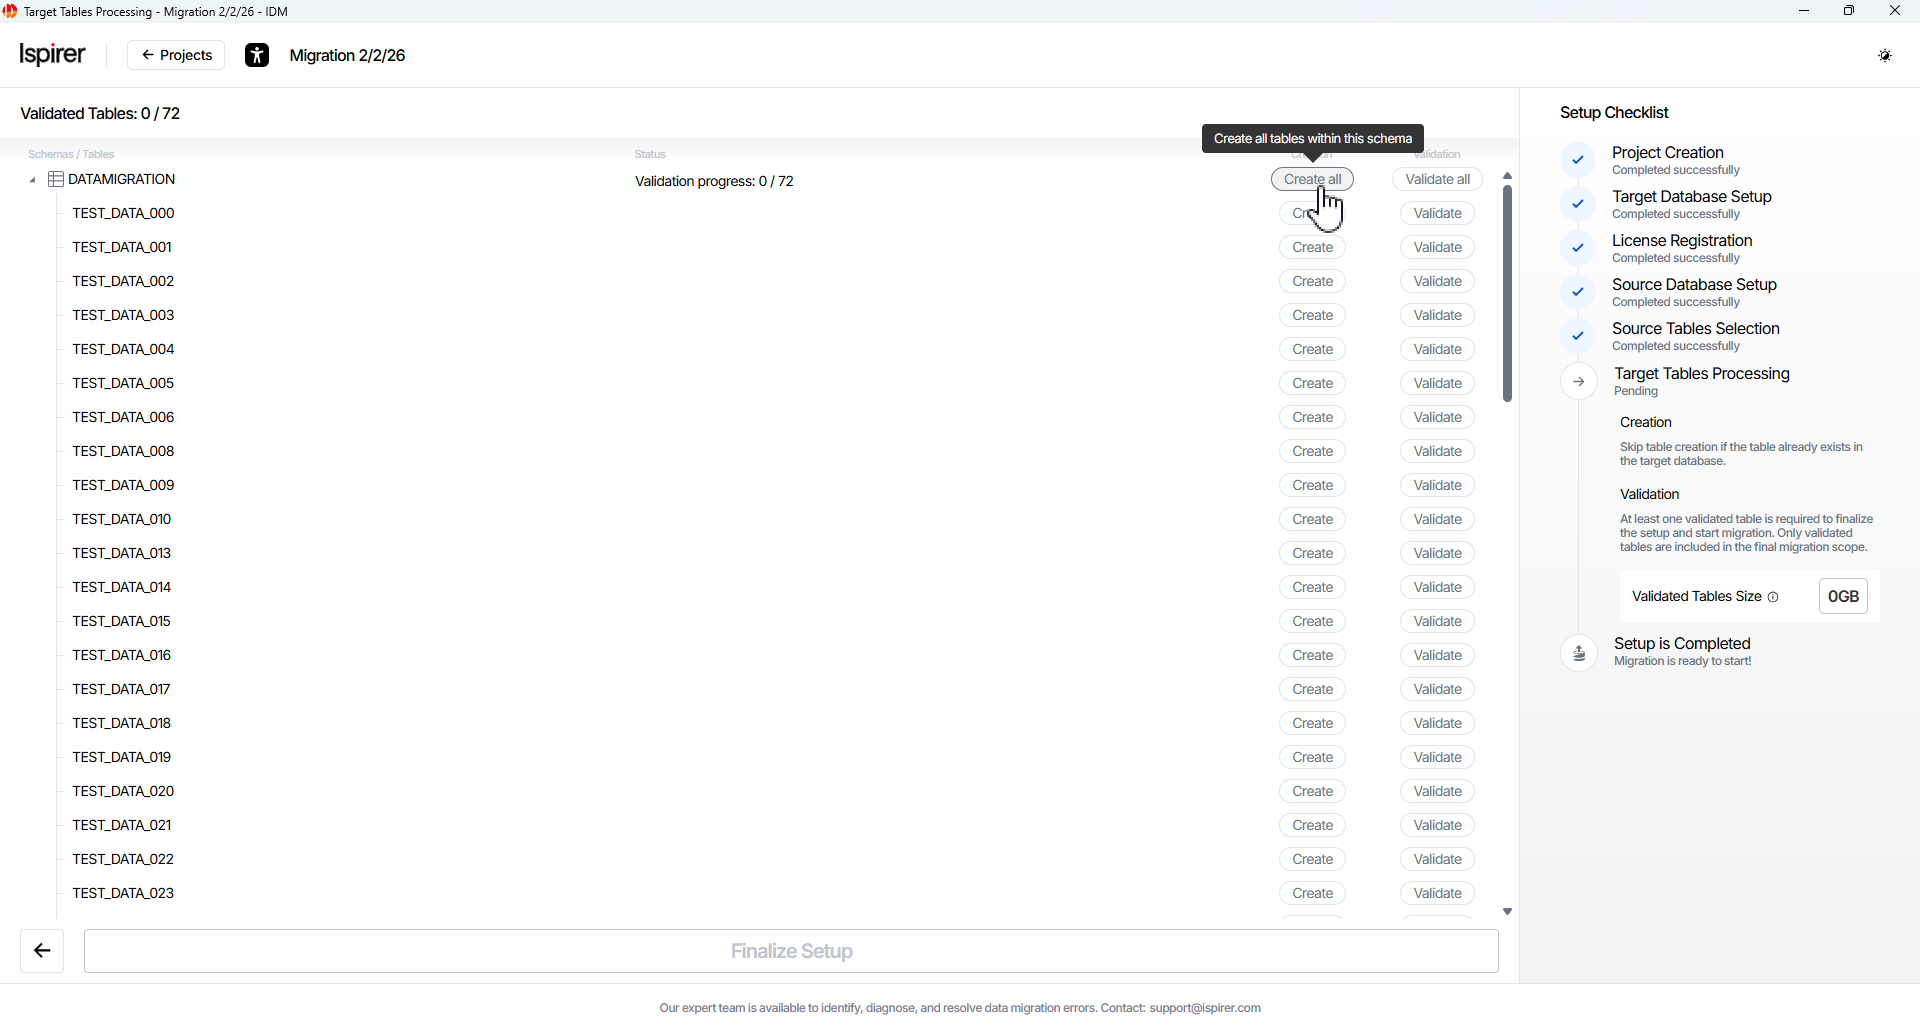
Click Create All and Validate All button for each schema or table included in the project scope. Wait for the validation status of each table to confirm successful execution.
Table Creation Statuses:
- Created. The table was successfully created in the target database by the system.

- Already exists. The table already exists on the target database and can be reused for migration.

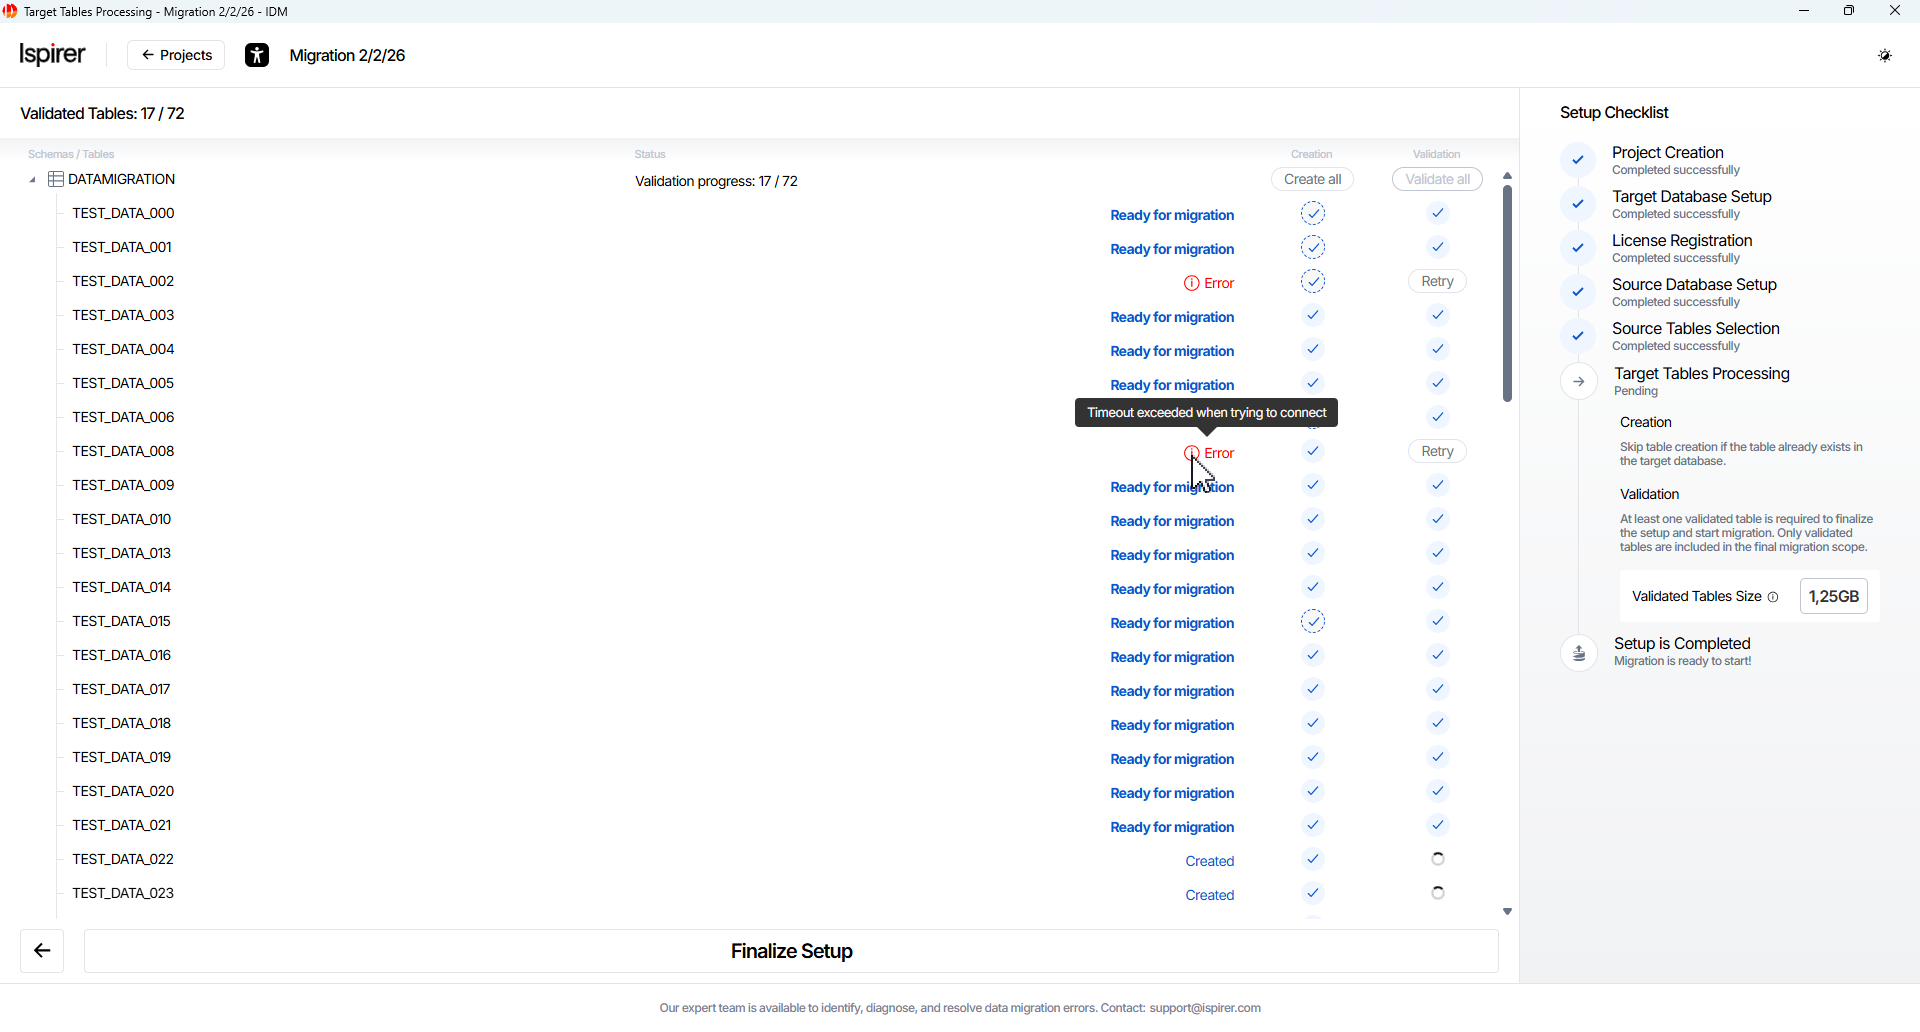
- Error. The table could not be created due to an error and requires user attention before proceeding.

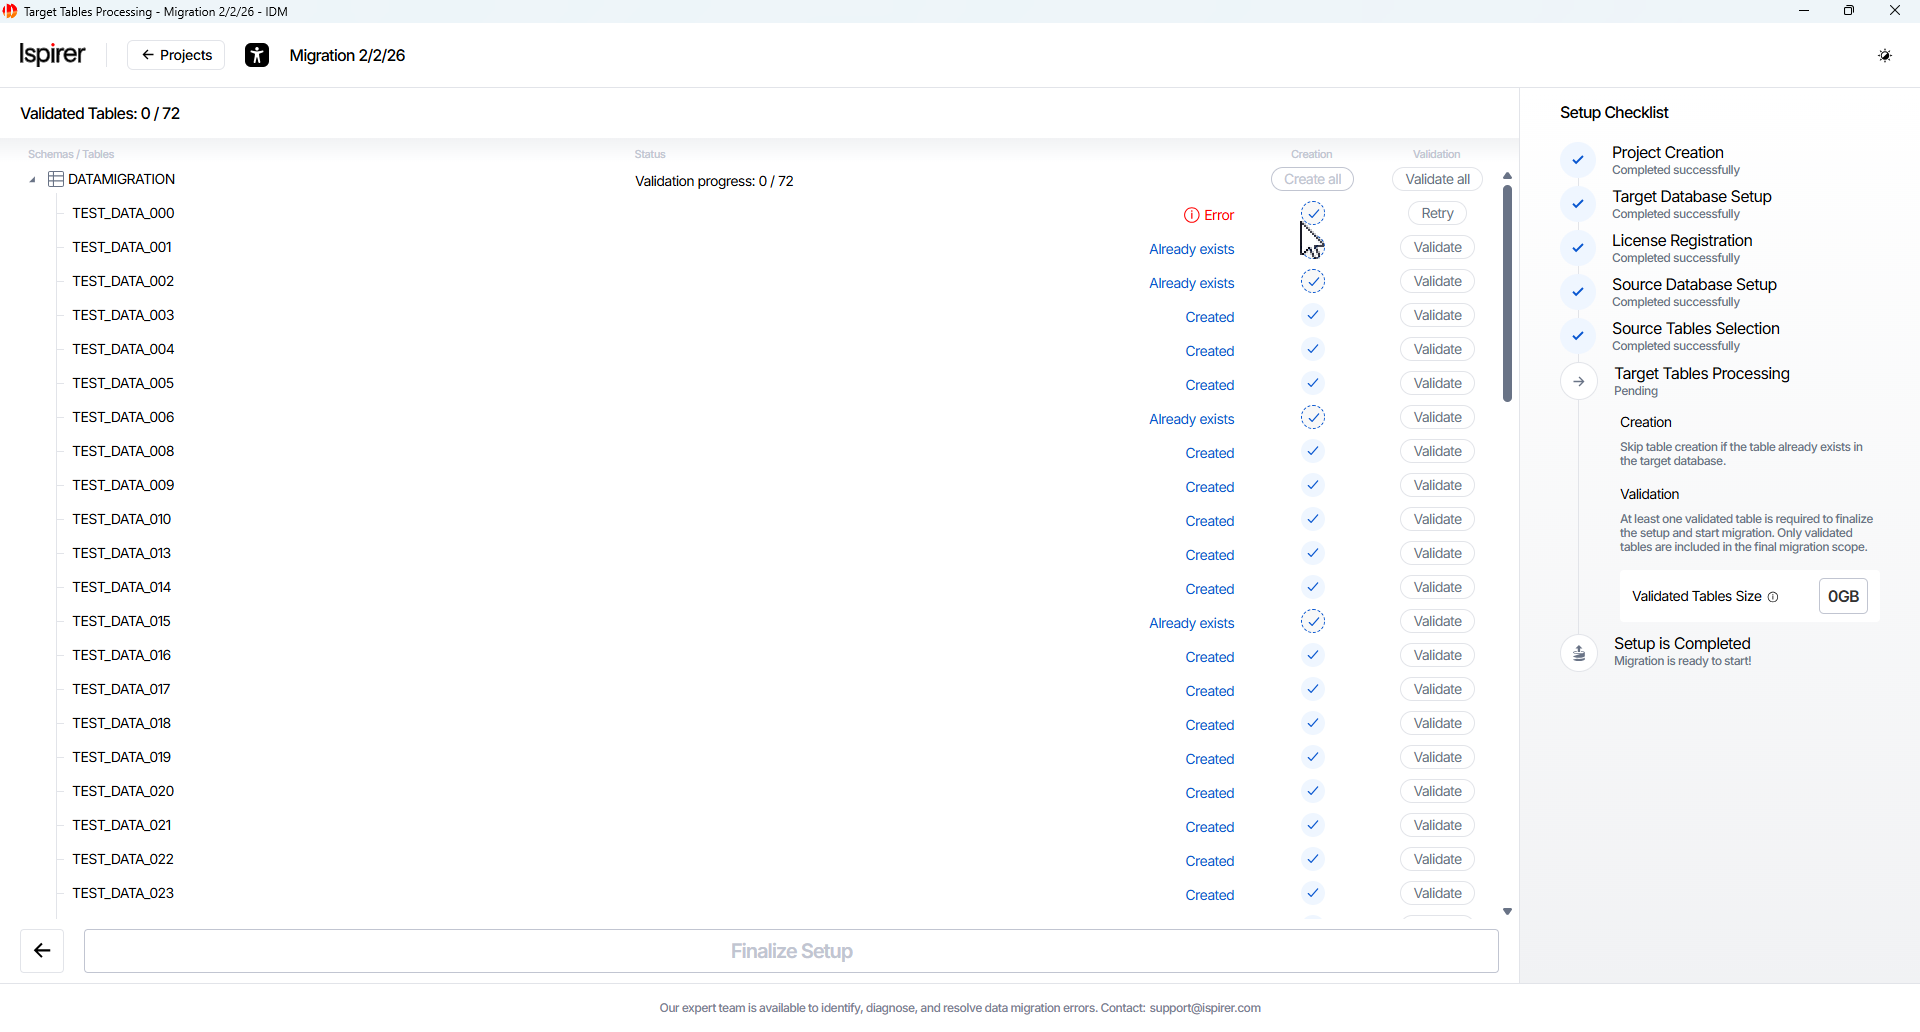
Table Validation Statuses:
- Ready for migration. The table has passed validation and will be included in the migration project after final setup.

- Error. The table failed validation and cannot be included in the migration until the issue is resolved.

Note: The target table names and columns are typically converted to lowercase by default. If you used manual import/adoption earlier (e.g., via SQLWays), existing tables can be validated without recreation. Only tables with the Ready for migration status will be included in the migration process.
Only validated tables are included in the final migration scope.
The Setup Checklist panel displays the total data volume for all validated tables as Validated Tables Size. The calculation is based on the source database size. The final migrated data size may vary slightly in the target database.
Click Finalize Setup button to continue. Upon successful validation, the Migration project page will open.
Important. After finalizing the setup, the source and target connections and the selected migration scope are locked, and migration proceeds using the validated objects only for this project.
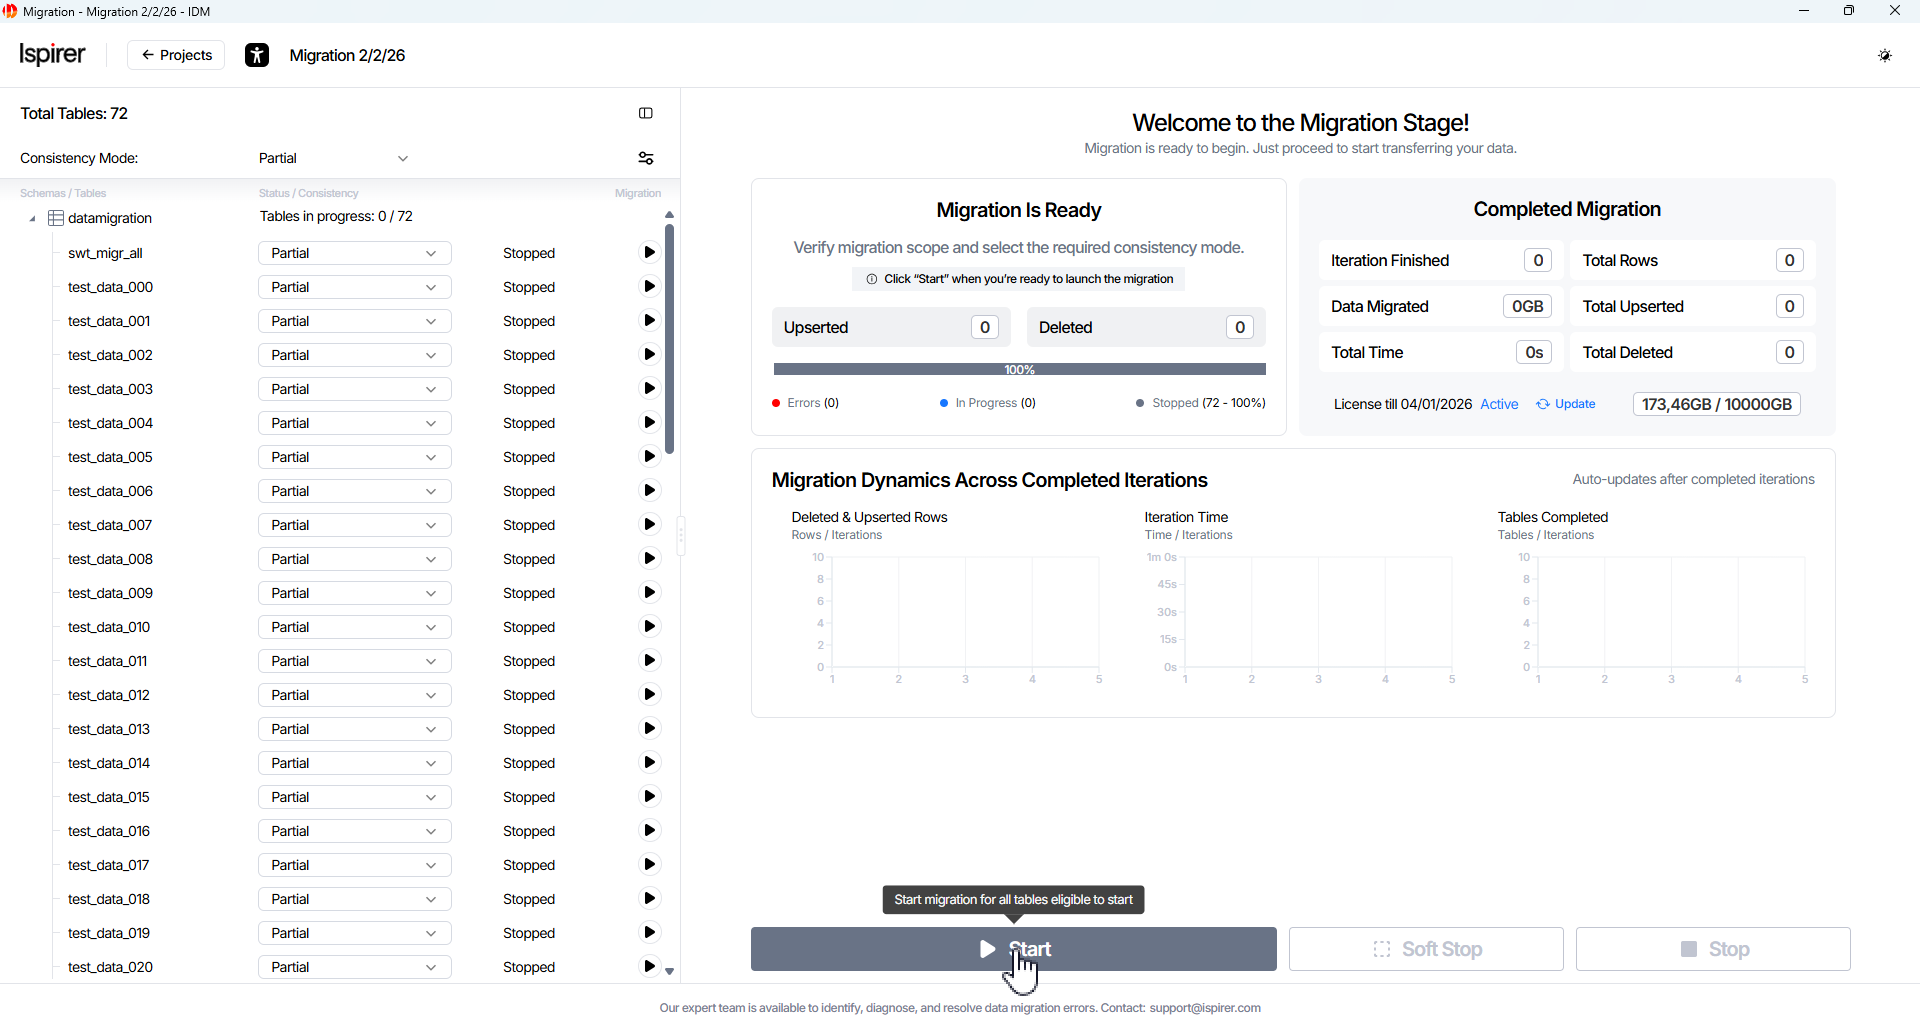
Start Migration Project
After completing the setup steps, the project configuration is locked and applied to the selected migration scope.
Migration is then performed and managed within this defined scope from the Migration Project page (also called the project dashboard or workspace), which is opened at this stage.
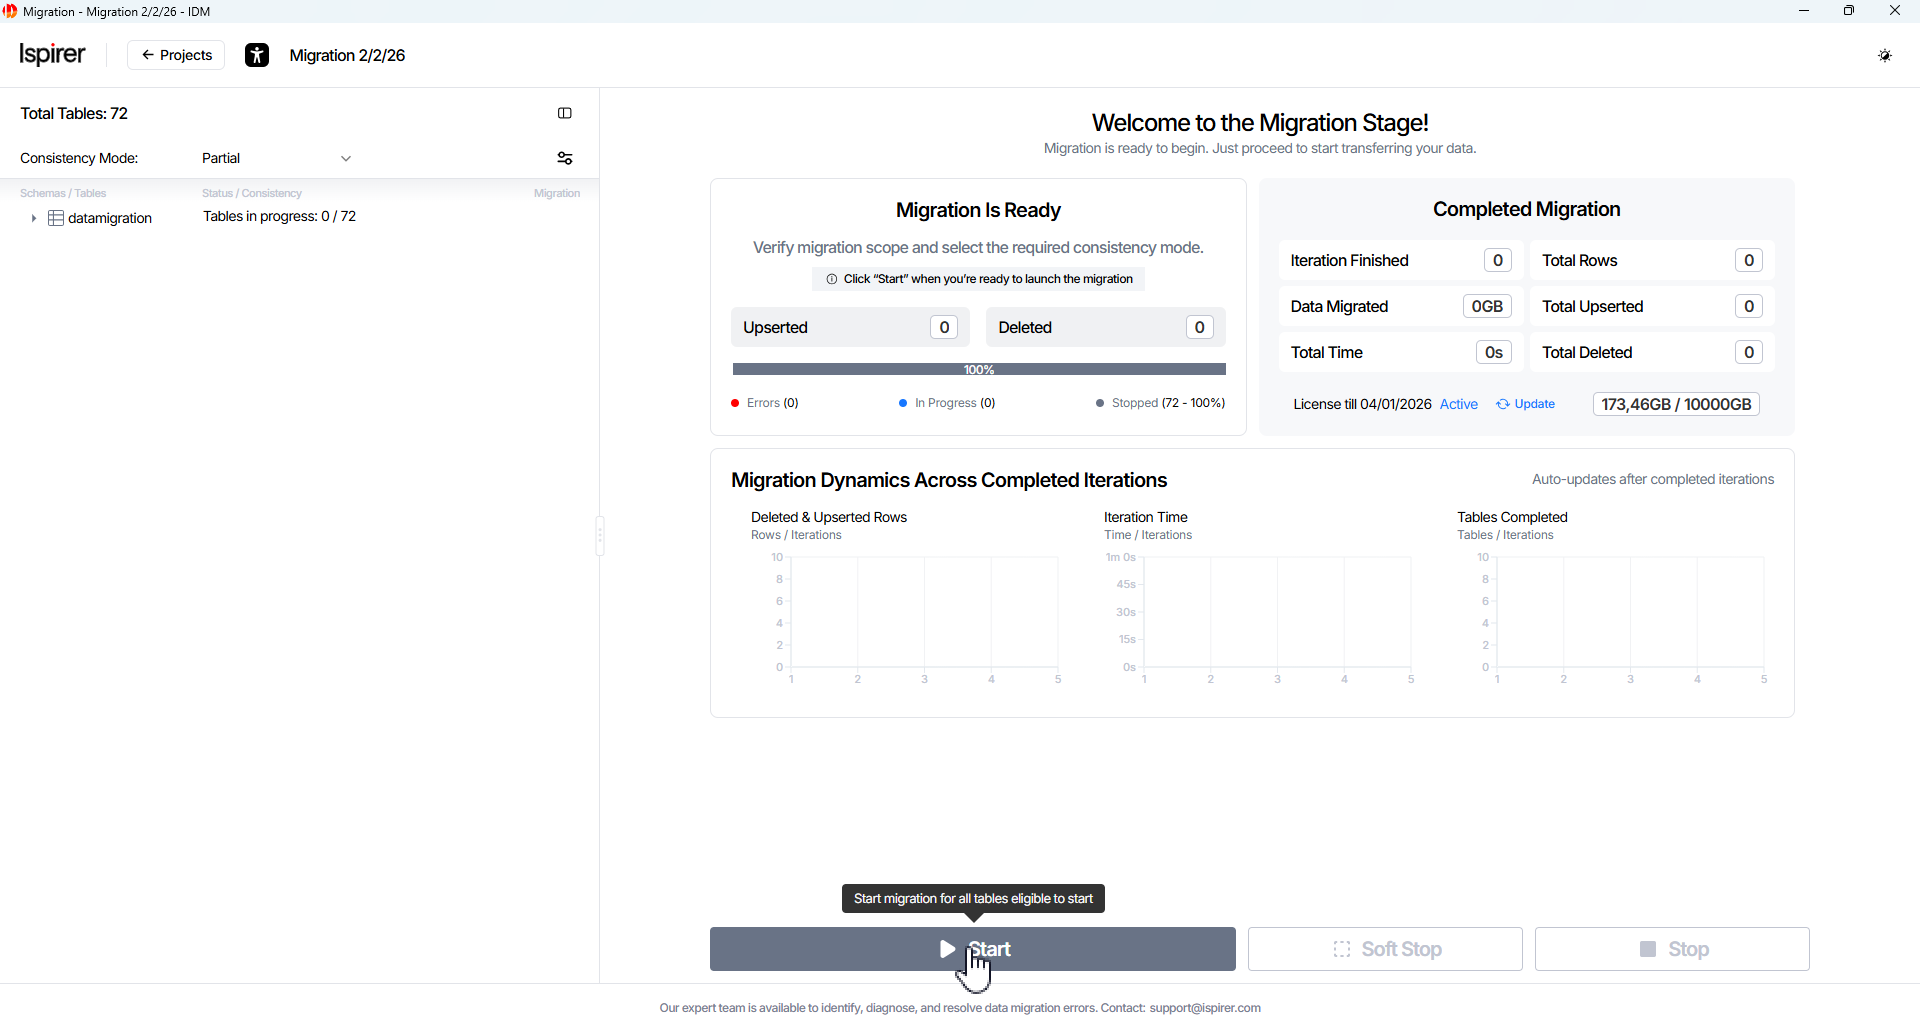
The workspace includes the following main components:
- Object Tree panel displays the hierarchy of schemas and tables included in the migration scope.
- Main project control buttons allow you to manage the migration process at the project level.

- Project metrics on the current and completed iterations panels provide high-level visibility into migration progress and results.
- Detailed Migration Dynamics charts visualize iteration-based metrics, including processed rows, iteration duration, and table completion.
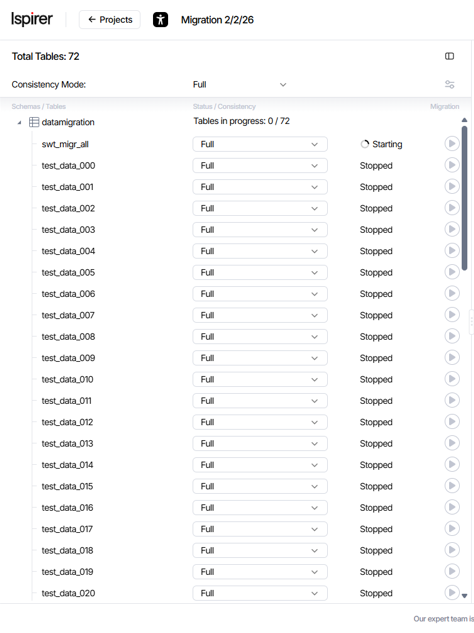
The Object Tree panel is a sidebar that displays the project object hierarchy, organized by schemas and the tables they contain.
When a schema is expanded, each table is shown with a dedicated card\component that includes the following information:
- Table Name field. The table name, as defined during the project Create and Validate configuration.
- Table Consistency Mode dropdown. The configured consistency mode; after migration starts, this field displays the progress indicator.
- Iteration Number field. Current or last completed iteration number (appears after migration starts).
- Table Status field. The current migration status of the table.
- Table Actions buttons. Buttons to Start / Pause / Stop / Resume the individual table.
Table Consistency Mode dropdown. Select the mode via the dropdown in each table card or globally at the project level (only available while tables are in Stopped state or via Weaken option during active migration):
- Full consistency option.
- Partial consistency option.
- Hybrid consistency option.

The consistency mode can be set globally for the project or individually per table.
Weakening Consistency Mode During Migration
If migration is already running, you can lower the consistency mode for a specific table (for example, from Full to Hybrid or Partial). To do this, click the Weaken button/icon next to the table name.

Note: If the table is already using the lowest consistency mode (Partial consistency), IDM will not allow further weakening.
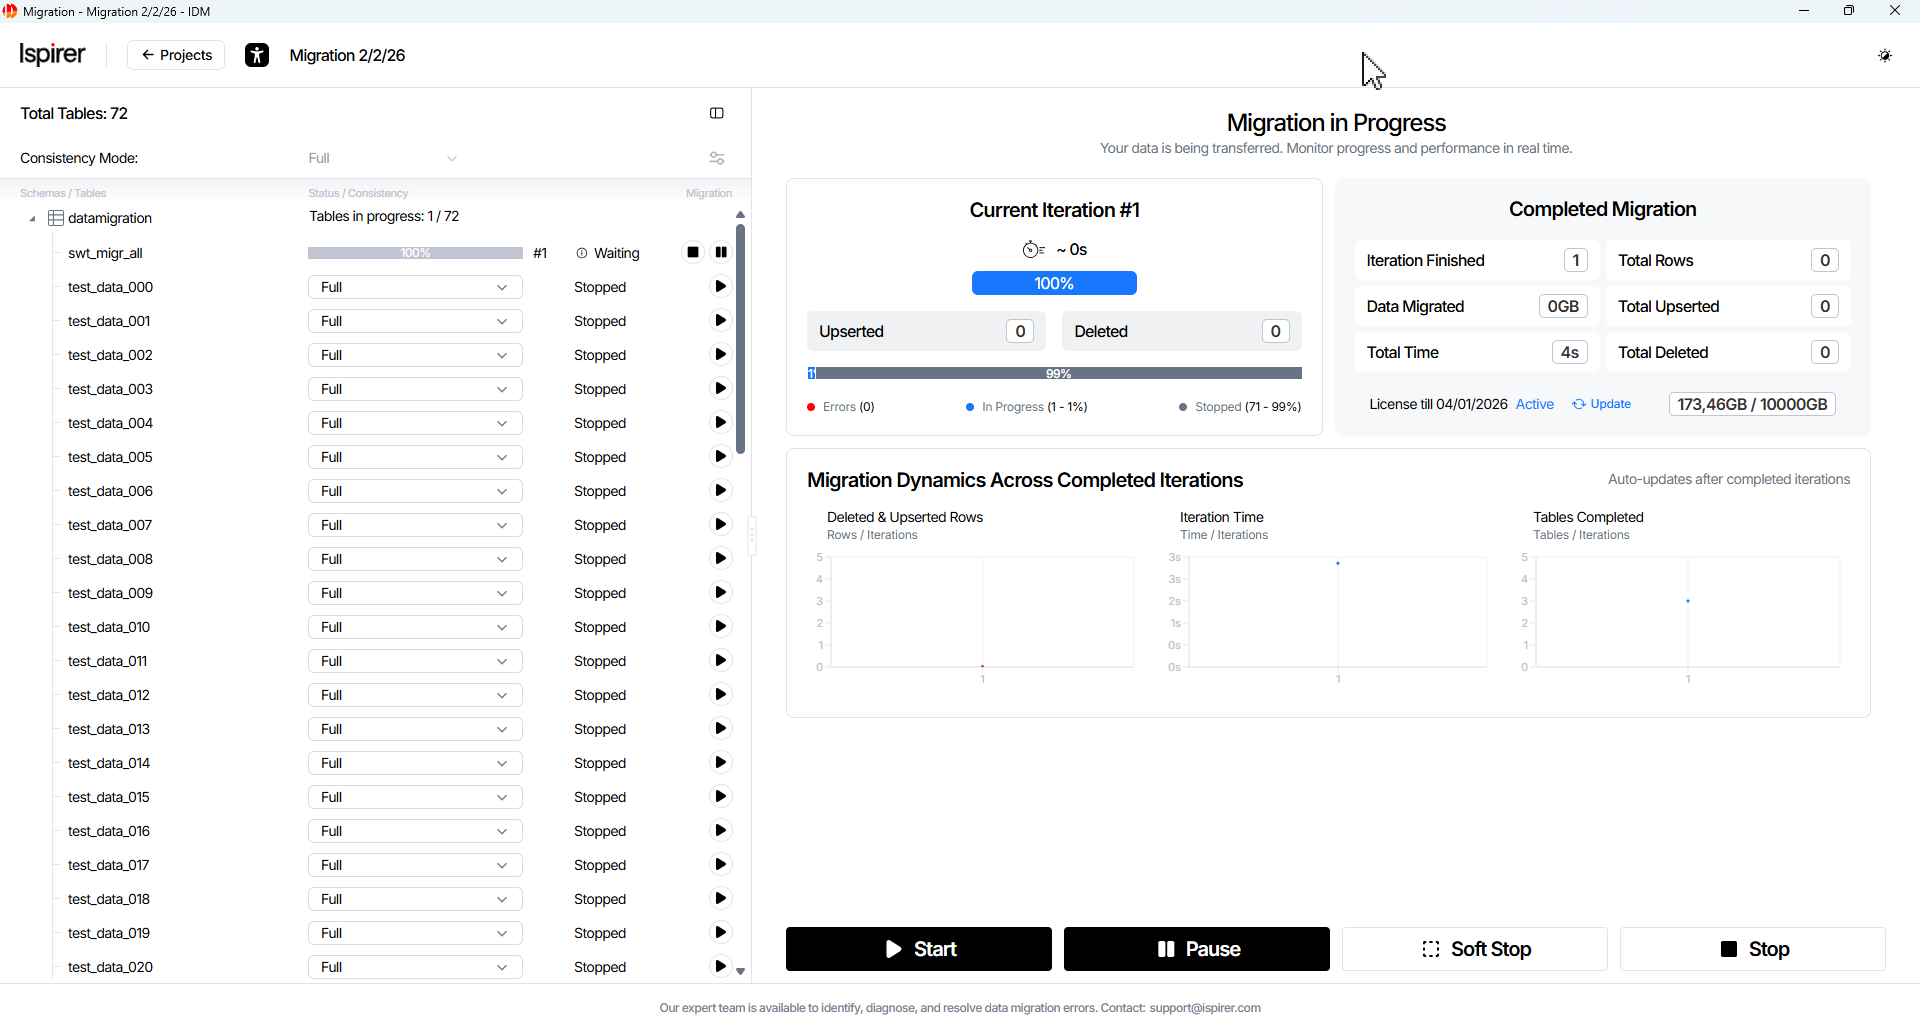
Table Status field. The current migration status of the table:
- Running. The table is actively participating in the current iteration, and migration processing is in progress.

- Waiting. The table has completed processing for the current iteration and is waiting for other tables to finish before the next iteration begins.

- Finalizing. The table is completing processing as part of a soft stop and will finish the current iteration before migration is stopped. This status is distinguished via a tooltip.

- Paused. Migration processing for the table is temporarily paused and will not continue until it is manually resumed.

- Stopped. Migration processing for the table is stopped, and the table is not participating in migration. A table in this state may skip iterations and rejoin migration when the project is running.

- Error (Retriable). The table encountered an error that blocks the start of the next iteration. The error must be resolved, or the affected table must be stopped before migration can continue.

- Error (Aborted). The table encountered an error that caused the current iteration to be aborted for this table. Progress for the current iteration is lost, but the overall migration continues with the next iteration.
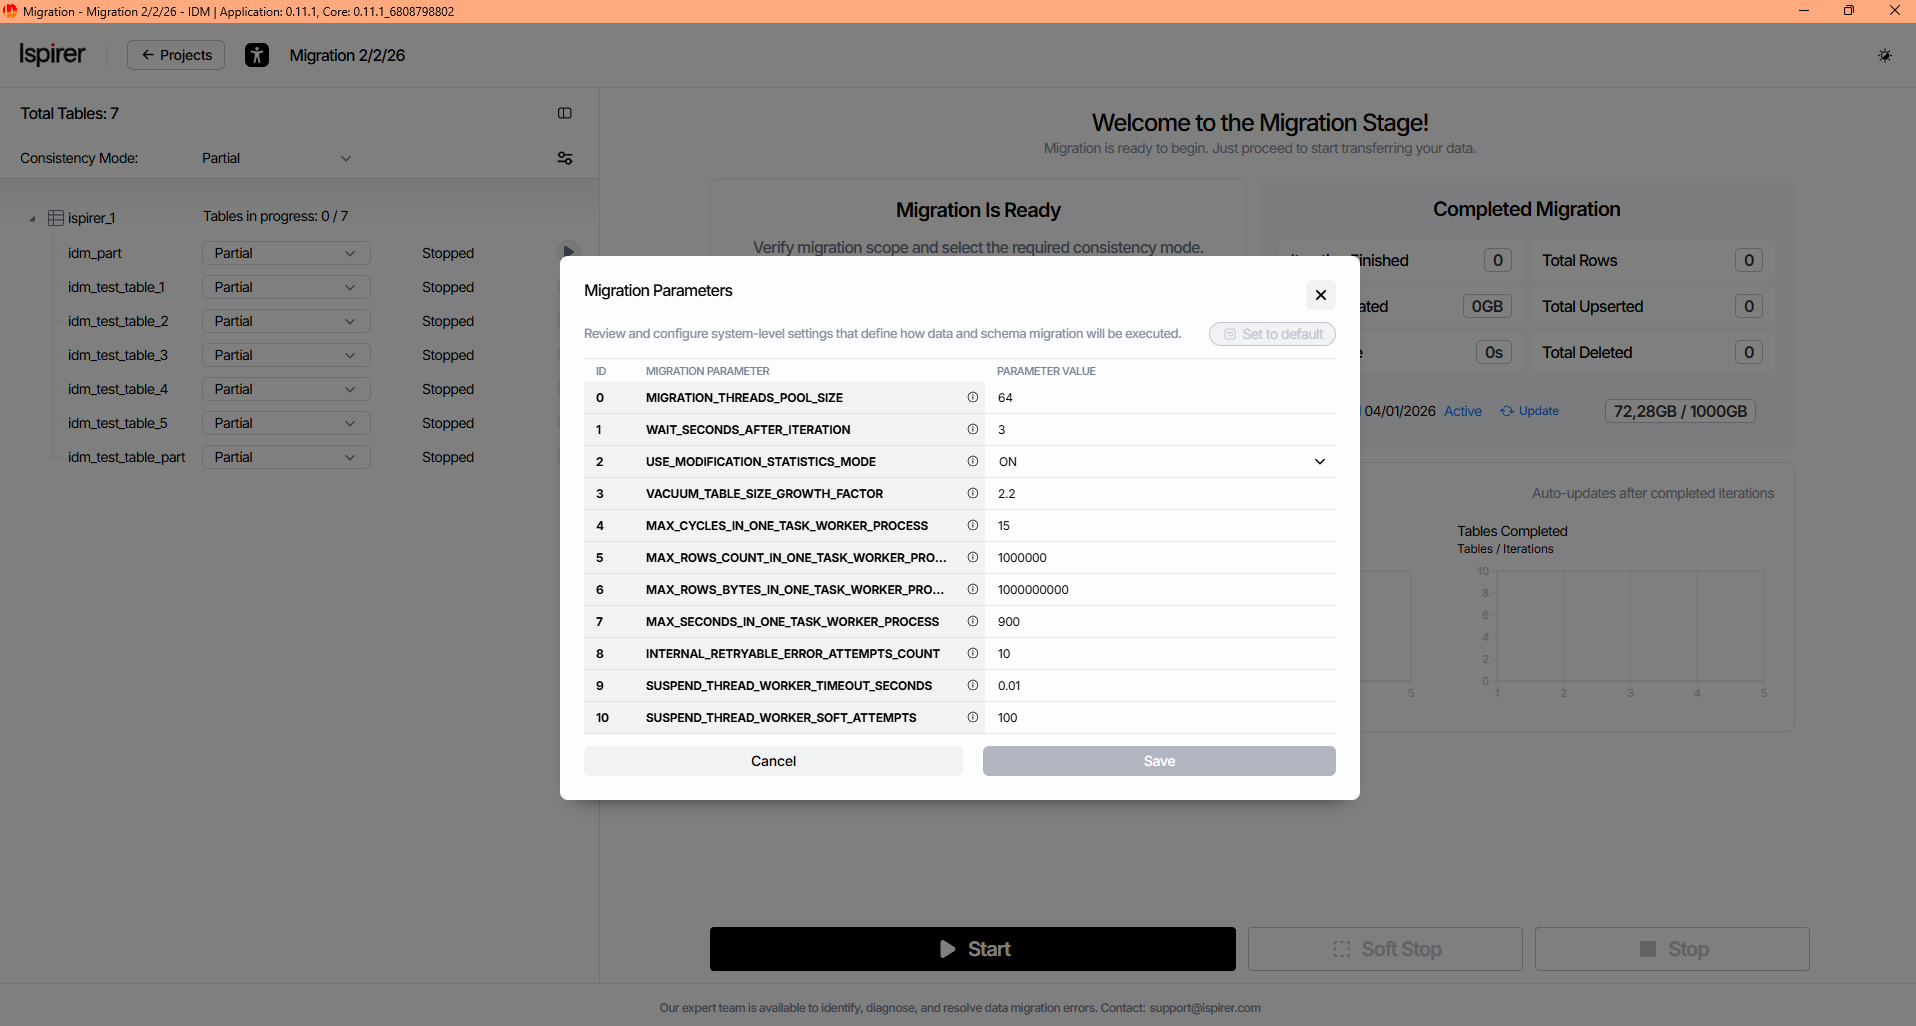
In addition to changing the consistency mode, you can access more advanced project-level tuning options.
Look for the Settings icon ![]() in the top-right corner of the Sidebar menu Migration Project.
in the top-right corner of the Sidebar menu Migration Project.
Clicking this icon opens the Migration Parameters window – a configurable list of system-level parameters that control the overall behavior of the migration process, such as parallelism, batch sizing, error handling, and performance optimizations.
These settings apply globally to the project. They allow fine-grained individual tuning for large-scale or complex migrations.
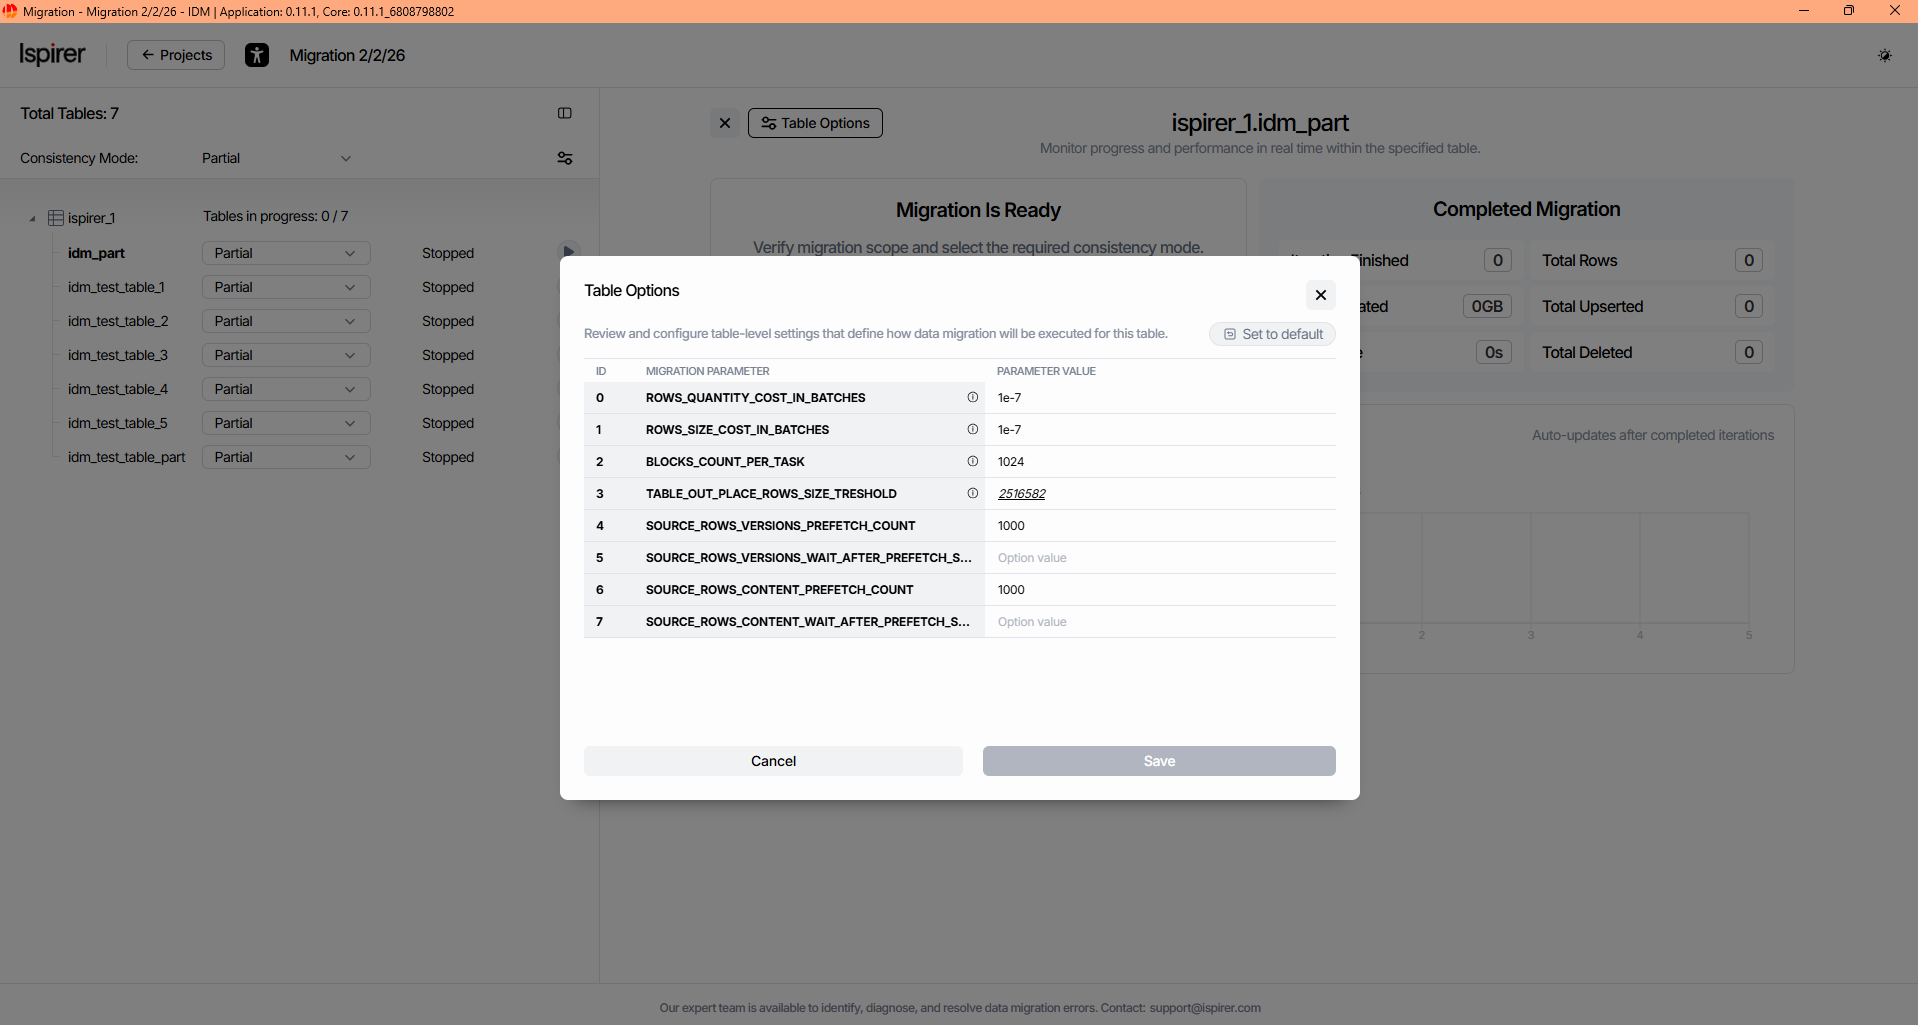
Settings for individual tables are also available only when the table is in the Stopped status. To access these settings, select a separate table and click the Table Options button  in the upper-left corner of the workspace. Next, a Table Options window opens with a list of all possible settings.
Manage Migration Project
Initial project state — all tables are in the Stopped status, the consistency mode is set to Partial Consistency, and only the Start button is available.
Consistency mode can be changed globally or per table while all tables (or the selected table) remain stopped.
Migration can be started using Main project control buttons for all tables, or triggered individually for each table via Table Actions buttons in the object tree.
To start project migration, click the Start button. This initiates migration for all tables in the project according to the configured scope and consistency settings.
The following sections describe how to manage migration at both the project and table levels.
Main project control buttons control for managing migration at the project level.
Start project button:
- Starts migration for all tables in Stopped or Paused table status.
- After migration starts, the Start button is replaced with Pause button.
- Migration can also be started individually for specific tables using table actions buttons.
Pause project button:
- Temporarily pauses migration processing for all active tables.
- Paused tables block iteration completion, and migration waits until they are resumed before starting the next iteration.
Soft Stop project button:
- Initiates a controlled soft stop of the migration process.
- The current and the next iteration are completed before migration is stopped, and you must wait until the process finishes.
- All active tables enter the Finalizing status and complete their iterations before stopping.
- This action is available only when no tables are in an Error or Paused table status.
Stop project button: Immediately stops migration processing for all tables, regardless of their current status (Running, Waiting, Paused, or Error). Progress for the current iteration may be lost. After stopping, the Start button becomes available again. A confirmation warning is displayed before executing this action.
Table Actions buttons for managing migration at the table level.
Table actions for the selected table: Start, Paused, Stop buttons
Table action availability by table status:
- Running status – Pause, Stop buttons
- Waiting status – Stop button
- Finalizing status – Pause, Stop buttons (no action is required for this flow)
- Paused status – Start, Stop buttons
- Stopped status – Start button
- Error (Retriable) status – Start, Pause, Stop buttons
- Error (Aborted) status – Start, Stop buttons
Migration runs in the background (via pg_cron) in repeated iterations until manually stopped. Closing the GUI or browser does not stop migration – it continues in its last state (Running or Stopped). You can delete the entire project (including metadata and control schema) from the home page project card
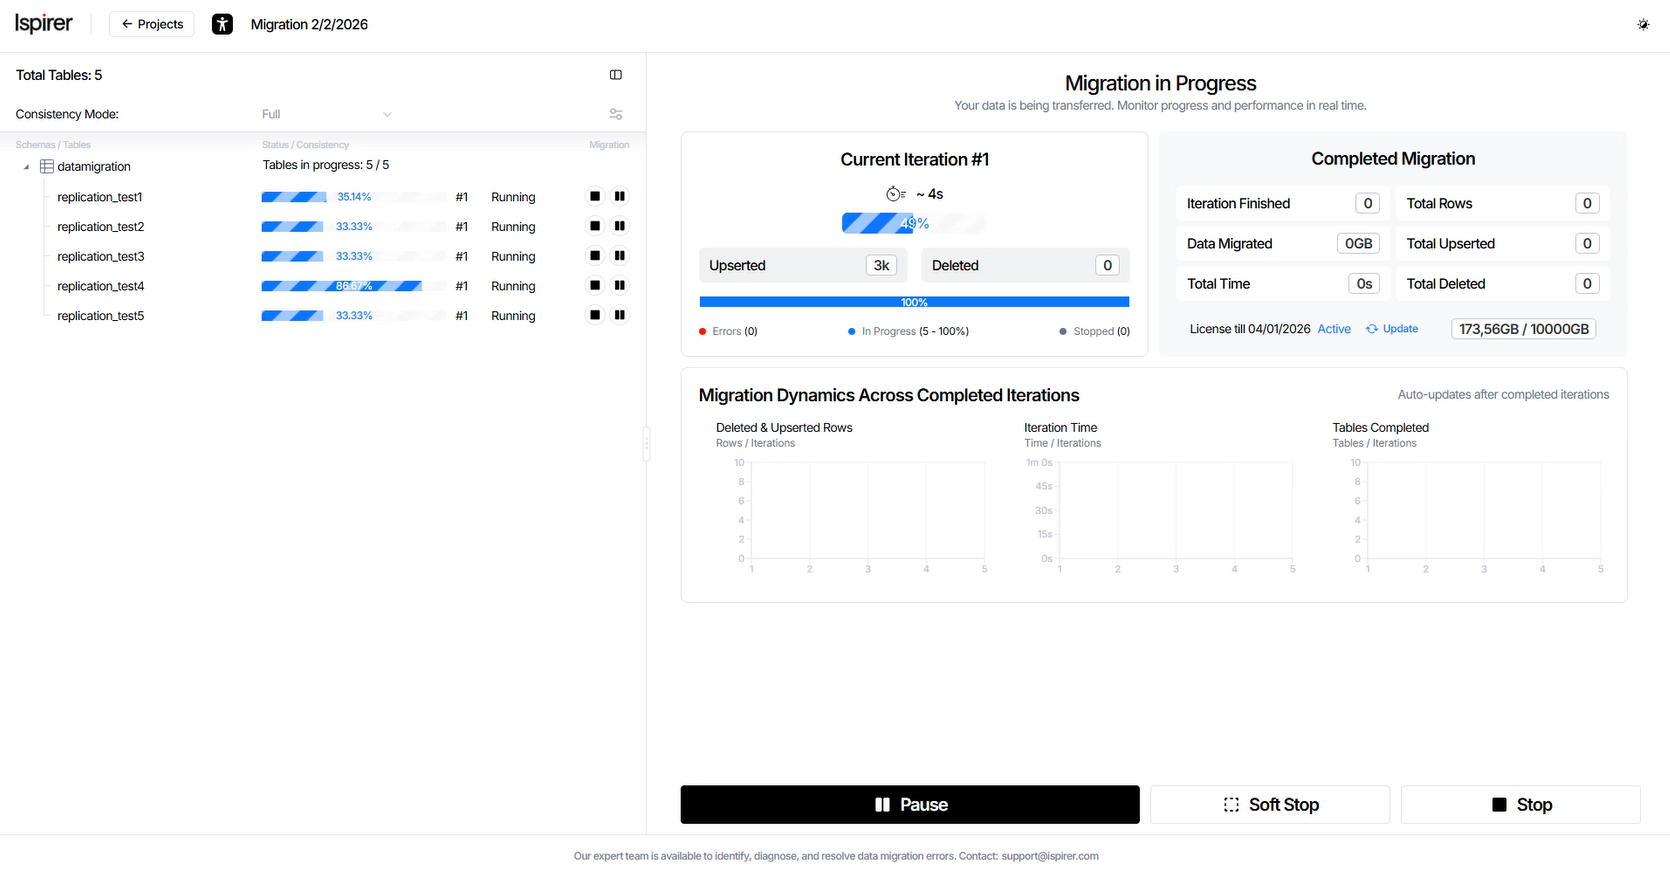
Migration Results
Migration progress and performance in real time can be viewed on the dashboard, which includes:
- Current Iteration panel
- Completed Migration panel
- Migration Dynamics charts
You can also verify migration progress and results directly on the source and target systems using your own database tools.
This allows you to inspect data, validate changes, and troubleshoot issues outside the application.
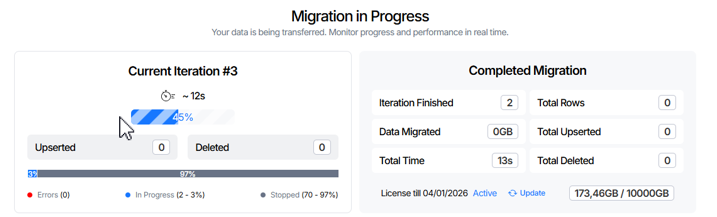
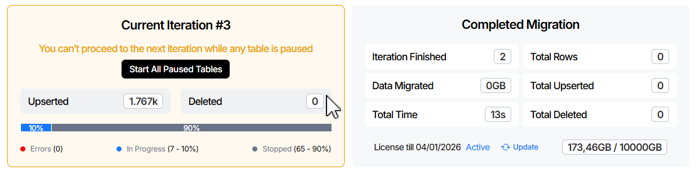
Current Iteration panel displays the following information:
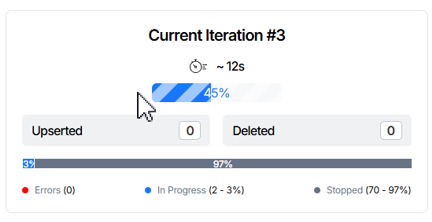
- Progress Bar element. Shows the current iteration number, estimated completion time, and migration progress percentage.
- Upserted field. Number of rows inserted or updated during the current iteration. This includes rows where data on the source was changed compared to the previous iteration, specifically, newly created records or modified existing records.
- Deleted field. Number of rows deleted in the current iteration. These are rows where data was deleted on the source compared to the previous iteration; the corresponding delete events were captured and applied to the target during the current iteration.
- Table Status Progress Bar element. Displays the migration progress for the table based on its current status.
Current Iteration panel helps you navigate alternative scenarios as they arise during migration:
- Stop Error Tables state. Stops migration processing for tables that are in an error state to prevent them from blocking the current or subsequent iterations.
- Start All Paused Tables state. Resumes migration processing for all tables that are currently paused and allows them to continue participating in the current iteration.
- License Expiration Update state. Indicates that the licensed data volume limit is approaching and notifies that the remaining migration capacity under the current license key is running low.
- License Expired Update state. Indicates that the licensed data volume limit has been reached or exceeded and disables migration processing until the license is renewed or updated.

Completed Migration panel displays the following information:

- Iteration Finished field. Indicates the total number of iterations that have been successfully completed during the migration process.
- Data Migrated field. The total amount of data processed across all tables in all completed iterations during the migration process.
- Total Time field. The total elapsed time spent processing all completed iterations of the migration.
- Total Rows field. The total number of rows processed across all tables in all completed iterations, including upserted and deleted rows.
- Total Upserted field. The total number of rows migrated across all completed iterations. This includes rows where data on the source was changed compared to the previous iteration, specifically, newly created records and modified existing records.
- Total Deleted field. The total number of rows where delete events were detected on the source across all completed iterations. These delete events were captured and applied to the target during the migration process.
- License Info element. Displays information about the current license, including the licensed data volume and its usage during migration.
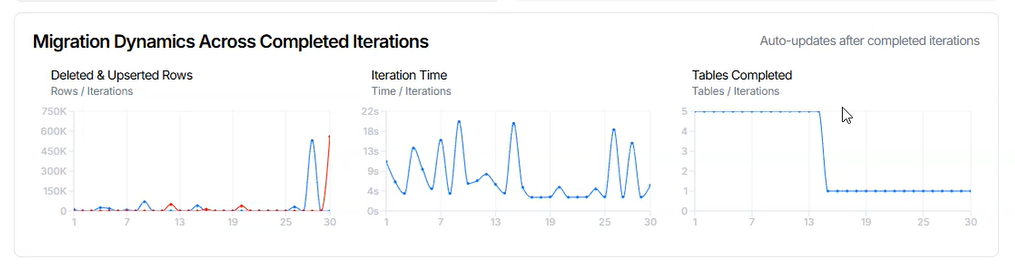
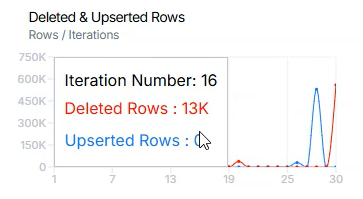
Migration Dynamics charts display:
Deleted & Upserted Rows chart shows metric values for completed iterations.
- X-axis: Iteration index.
- Y-axis: Represents the measured value for deleted and upserted rows across all data tables participating in the iteration.
Values are updated after each iteration is completed.
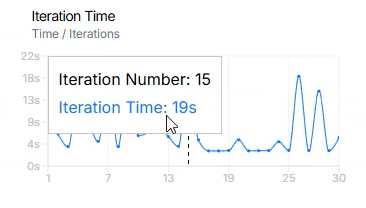
Iteration Time chart shows metric values for completed iterations.
- X-axis: Iteration index.
- Y-axis: Represents the total processing time required to complete each iteration.
Values are updated after each iteration is completed.
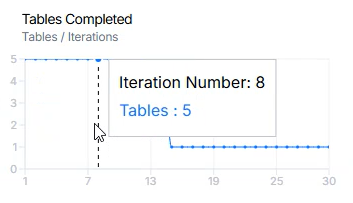
Tables Completed chart shows metric values for completed iterations.
- X-axis: Iteration index.
- Y-axis: Represents the number of tables that successfully completed processing during each iteration.
Values are updated after each iteration is completed.