Table of Contents
About Ispirer Systems
Ispirer Home Page Database Migration Application Conversion Downloads
Database Conversion
Database conversion implies that you can convert objects directly from the database using an ODBC connection. This process is divided into 2 stages: the export stage and the import stage. Below we will describe each of them in detail.
Setting Up ODBC Connection
To be able to connect to the source database, you must configure an ODBC connection. This means that the Oracle client and Oracle ODBC software must be installed. Certain entries in the odbc.ini, odbcinst.ini files must also exist.
Please follow the official installation instructions:
Download Oracle Instant Client
Install Oracle Instant Client ODBC
Preparing Command Line
First of all, you need to compose the appropriate command line to run the tool.
The command syntax is:
 SQLWays
 /D=<source ODBC alias> /U=<login> /P=<password>
 /TARGET=<target DB> /TH=<target_host>/TD=<target_database> /TU=<user> /TP=<password>
 /DIR=<result_directory>
 {<objects to be converted>}
 /INI=<ini_file_path>
 [/NSTOP] [/SROW=1]
 [/LOG=<log file name>][/IMPS=Unix][/STDEL=<delimiter>]
 [/TRACE]

 <objects to be converted>:
 [/O=<objects template>] [/T=<tables template>] [/V=<views template>] [/SP=<procedures template>] [/FN=<functions template>] [/TG=<triggers template>] [/PKG=<packages template>] [/SQ=<functions template>] [/SN=<synonyms template>] [/UDF=<types template>]
  |  /PRJF=<project_file_path>
Note: SQLWays command line options are case insensitive and their order is insignificant. Description of parameters:
Required parameters:
SQLWays - the name of the program that performs the conversion.
- /D - specifies the ODBC Data Source Name (DSN) to connect to the source database (currently only Oracle and SQL Server are supported as a source technology! Needs to be configured in advance).
- /U - specifies the username for the source connection. Note that the user must have appropriate rights to select from the Oracle database system catalogs.
- /P - specifies the password for the source connection.
- /DIR - specifies the location of the generated files (output directory).
- /TARGET - specifies the target database (currently only PostgreSQL supported as a target technology).
- /TD - specifies the target database name, into which the import should be done.
- /TH - specifies the target host/server name.
- /TP - specifies the password that will be used to connect to the target database.
- /TU - specifies the username for the target connection.
- /INI - specifies the options file. The options file is a file that stores all the options supported by the tool. The options file with the default settings can be downloaded here (make sure the file's end-of-line characters (EOL) are in UNIX format (LF only)). More information about the supported options can be found in the the Options File Description. Options are developed to change the default conversion output. For the first time, we recommend running the conversion with default settings. If you expect the result to be different, you may contact our technical team for details: support@ispirer.com
- Objects must be selected for the conversion using one of the following arguments:
- /O, /T, /V, /SP, /FN, /TG, /PKG, /SQ, /SN, /UDF (recommended) - depending on the argument, all objects, or tables, or views, or stored procedures, or functions, or triggers, or packages, or sequences, or synonyms, respectively, will be retrieved for conversion. As a value, you can specify a mask or the full name of an object with a schema (a description of the argument can be found in the link). You can use several in one command.
- /PRJF (for experienced users) - specifies the path to the project file. This file stores information about the objects specified for conversion. Here you can find information about the project file: Project File Description. A project file sample can be downloaded here (make sure that the file's end-of-line characters (EOL) are in UNIX format (LF only)). This file can be used to control functionality such as data type mapping or name mapping.
Optional parameters:
- /SROW - the row starting from which the data will be unloaded (set to 1 by default).
- /NSTOP - the conversion will be proceed even if an error occurs.
- /LOG - specifies the name of the conversion log file (sqlways.log is the default value).
- /IMPS - specifies the system on which the conversion is performed (if not set, the IMPORT_SYSTEM option in the [COMMON] section of the options file will be checked).
- /STDEL - statement termination string (“;” is the default delimiter).
- /TRACE - the conversion will be done in Trace mode. This allows you to view the commented source code along with the converted target code in the same SQL script.
Information about all supported command line options can be found in the Command Line Options article.
Command sample:
SQLWays /D=ORACLE_ODBC /U=login /P=pass /TARGET=PostgreSQL /TH=postgreservername /TD=dbname /TU=postgres /TP=postgres /DIR=/home/bob/project1/Export /INI=/home/bob/project1/wzd_sqlways_db.ini /PRJF=/home/bob/project1/sqlways.xml /TRACE
Running Command Line
Once we have prepared the command line with the appropriate set of options, we need to run it in the terminal:
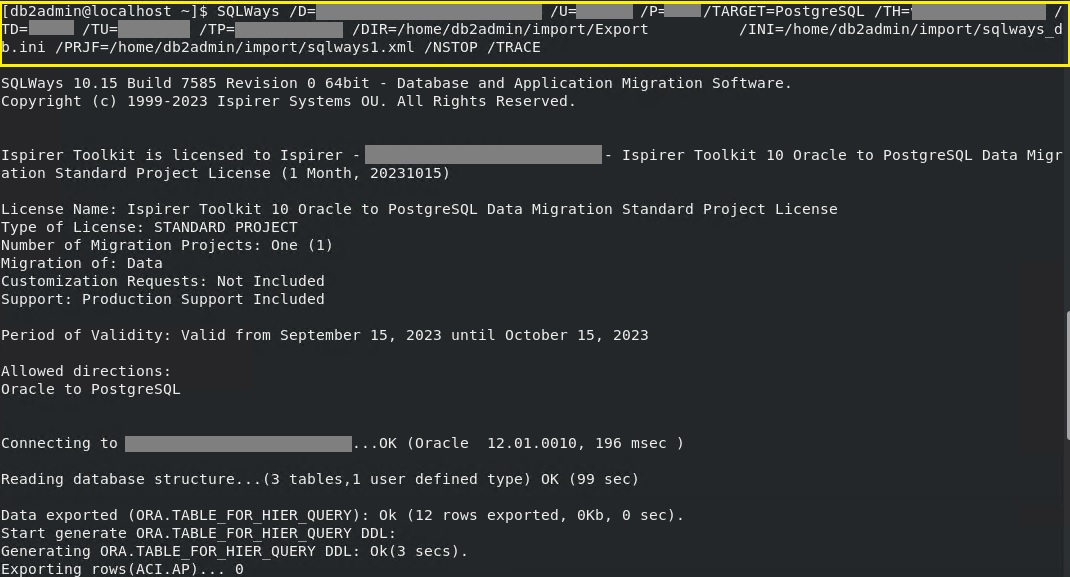
And as a result, we will see all the generated files in the output directory:

sqlways.log - conversion log, which stores messages about the conversion process;
sqlways.trc - trace file that stores detailed information about the conversion process (in case the /TRACE argument was set);
reports - folder with html reports;
.sql - corresponding file(s) with converted SQL code;
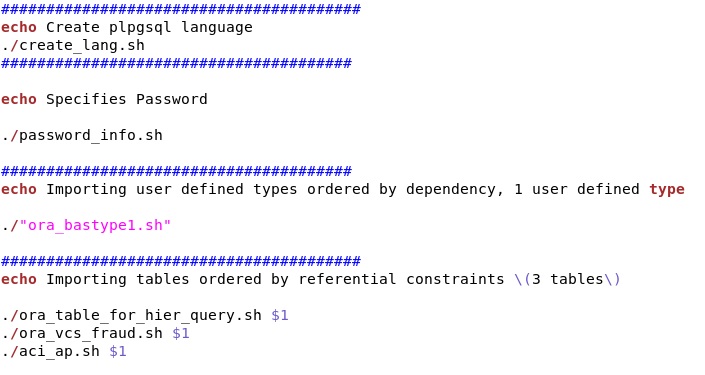
*.sh shell - scripts with import commands inside;
sqlways_all.sh - main shell script to call all *.sh file(s) in the correct order;
*.ldi - files with the COPY command to load data;
*.txt - file containing table data.
Import to Target Database
First of all, to be able to run the import, the target database client and associated utility must be installed on the machine on which you are performing the migration, since this utility's specific command will be generated and the import will be executed using it. For example, for PostgreSQL as a target, the psql must be installed.
During the conversion process, SQLWays generates all the scripts and commands required for the import and then runs them in the appropriate order to maintain referential integrity.
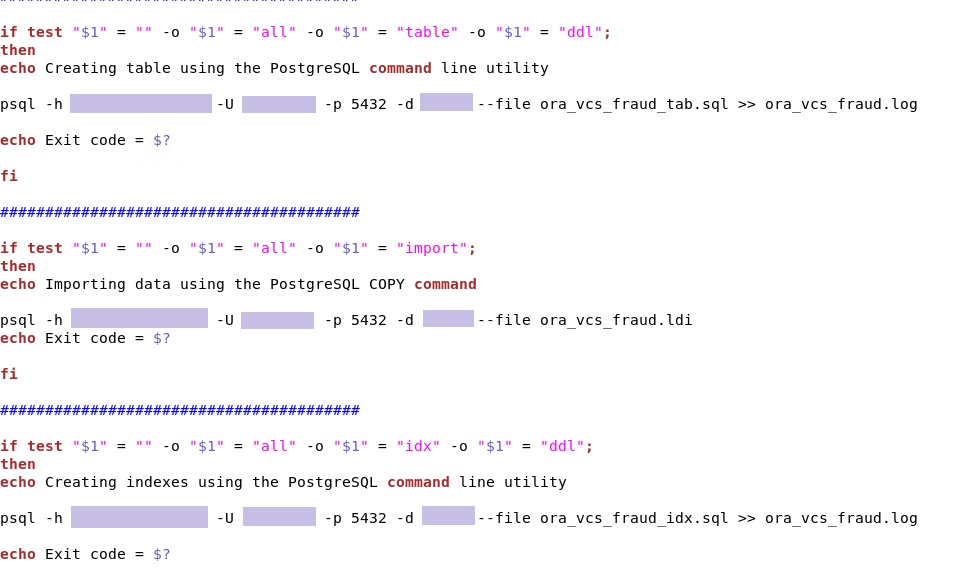
So, to start the import, we just need to run the generated “sqlways_all.sh” (2) file. To do this, we need to go to the output directory (1) (the directory we specified in the /DIR option) and call it (in case of an error when calling *.sh, the execution permission can be set with the chmod +x * .sh command):

sqlways_all.sh contains a list of other *.sh files, inside which there is a psql command to import the corresponding objects (make sure the $PATH variable has the /usr/bin directory path):
 |  |
sqlways_all.sh can also be executed as follows:

In this case, all information about the import process (all warnings, notifications and error messages) will be stored in the “sqlways_imp.log” file. This is an optional argument and can be omitted if you do not want to save the import results.
Another option that can be changed is the “all” argument, which affects the type of object that will be imported. Possible values:
all - import all objects, including data;
table - import only tables definitions;
import - import data only;
cns - import table constraints only;
idx - import table indexes only;
ddl - import all objects without data.
Thus, with their help, you can import objects in the required order.
Errors Output
Current errors are output using the echo Exit code command:
 psql -h postgreservername -U postgres -p 5432 -d dbname --file some_proc_calls.sql >> some_proc_calls.log
 echo Exit code = $?
In this case, if an error occurs during the execution of the sql script, the exit code is still 0. If an error occurs while connecting to the server, then the exit code is 2.
If you need the exit code to be different from 0 in case of an error in the sql script, then you need to set the -v “ON_ERROR_STOP=1” argument of the psql command:
 psql -h postgreservername -U postgres -p 5432 -d dbname --file some_proc_calls.sql -v "ON_ERROR_STOP=1" >> some_proc_calls.log
 echo Exit code = $?
The Exit Status details are described in the following documentation.
A more detailed list of command line options can be found here: Command Line Options Command-line Options
If you have any questions on how to run the migration in batch mode, please contact our technical team: support@ispirer.com