Table of Contents
About Ispirer Systems
Ispirer Home Page Database Migration SQLWays Pricing
Database Migration Guide
This guide describes a typical process of database migration using SQLWays® step by step. The guide is based on a particular example of sample of migrating one database to another. The process described will remain the same for all the supported databases.
Home page
This is the main page of the tool and contain information about the created projects, license information.

If your version of Ispirer Toolkit is not yet registered, you will see the corresponding text in the “License Information” box on the main page(e.g. “This software is not registered.”). Please go to the Registration Information chapter and follow the instructions to register the toolkit. If your license has expired, please request a new one on the Ispirer website.
For the toolkit that has already been successfully registered with a license that is still actual, you can start using the tool and create new project by clicking “Create a new project” button.
Managing existing projects
From the Home page, you can manage your existing projects:

Create new project page
All object, data, and code conversion operations are performed within projects.
To create a new project, click Create New Project. The project creation window will then open.

On the New Project creation window, the user need to enter the following info:
- Project name. This is a required field.
- Source Type. Database or Scripts. At this moment only database is supported.
- Source technology
- Target Technology
Source Technology
In the Source Technology section, the user must select the source database technology.
Next, the user needs to choose a connection method for the source database. Two connection methods are available:
- ODBC Driver (for Oracle and MS SQL Server technologies only)
- ODBC Connection
ODBC Driver
If the user selects the ODBC Driver method, they can choose an installed ODBC driver by clicking Select Driver and selecting a driver from the drop-down list of available drivers for the selected source database technology.
If no suitable ODBC driver is installed, the user can download and install one directly through the tool. Click Install a Driver to open the installation window. Then click Install to download and install the latest available driver. Once the installation is complete, the window closes automatically and the user can proceed with the connection setup.

To connect to the source database, the user must provide the following information: Host, Port, Service name (for Oracle) / Database name (for MS SQL Server), select System View (for Oracle) and use username with password. After all required fields are completed, click Test Connection.
If the connection is successful, the Source Technology section is marked with a checkmark, the Test Connection button label changes to Connected Successfully, and the user should proceed to fill in the information about the Target technology.
Note: The ODBC Driver feature is currently available only for Oracle, MS SQL Server, SAP ASE, IBM DB2 and IBM Informix source technologies. For all other technologies, only ODBC Connection method is available).
ODBC Connection method
Another way to connect to the source database is using the ODBC Connection method. The user need to choose an ODBC connection from the list of existing connections on the machine where the tool is installed, and specify the database username and password. The user specified on that page should have enough rights to successfully execute SELECT statements from system tables of the source database. More information about the source database user privileges can be found on the Database: Setup and Troubleshooting page.
Once the user provides the ODBC connection, username, and password, user need to check connection by clicking the Test Connection button. After clicking Test Connection, the tool should verify the connection using the specified ODBC connector and credentials. If the connection is successful, the Source Technology section is marked with a checkmark, the Test Connection button label changes to Connected Successfully, and the user should proceed to fill in the information about the Target technology.

Target Technology
In the Target Technology section, the user need to specify the destination for migration. To do this, the user selects the required technology from the drop-down list and, optionally, specifies the version of the target technology.
After the user selects the target technology, additional options appear below that should be specified. The set of options varies depending on the selected target.
For example, for the PostgreSQL database family, the following fields should be provided:
- Host
- Port
- Database
- Username
- Password

Note: If your target is not a PostgreSQL database, you will need to provide a path to a bin directory. This is the folder where the target database native utilities are stored on your computer where Ispirer Toolkit is installed. It means that to perform the import to the target database, you need to have the native utility installed on the computer where you run the conversion.
Oracle
For Oracle you need to specify the path to the folder containing the sqlldr.exe tool.
Microsoft SQL Server
For Microsoft SQL Server you need to specify the path to the folder containing the bcp.exe and sqlcmd.exe native utilities.
MySQL
For MySQL database you need to specify the path to the folder containing the mysql.exe native utility.
If there is no need to import conversion results into the target database, user can switch off “Conversion with import” option and in that case, converted objects will not be created in the target database.
Once all fields are filled in, the user have to verify the connection to the target technology by clicking Test Connection. The tool then validates the connection using the provided credentials. If the connection is successful, the user can proceed by clicking Create Project to create a new migration project.

Upon successful project creation, the tool generates an empty migration project and navigates to the project workspace — the project dashboard.
Project page
Once a new project is created, the user is presented with the project workspace, which includes the following components:

1. Sidebar Menu — contains the buttons Home, Migration and Help.
- Home — opens the tool’s home page with the list of projects.
- Help — opens a page with contact information and a list of useful links.
- Migration — opens the current stage of the migration project.
2. Project Objects Panel — contains a search bar, filter button, button for changing of grouping in the Object tree, a list of the current project’s objects and their statuses, and provides the ability to add objects to the migration project using the Add Source Objects button.

3. Current Project Panel — displays the project name and the migration direction. It also allows the user to view the list of projects without navigating to the Home page and to switch to another project.
4. Top Menu — contains buttons for opening various workspace panels: Dashboard, File Editor, Log Files, and Settings.
- Dashboard — shows general information about the current project, tips, process tiles for conversion and import, and information about the number of errors.

- File Editor — provides a workspace for working with output files. It allows the user to edit results, save them, and perform imports.

- Log Files — provides a workspace for reviewing log and trace files.
- Settings — contains options for conversion, type and name mappings.

5. Workspace/Window — its layout and functionality depend on which section is currently selected in the top menu.
Select objects for migrations
A migration project is created empty and does not contain a list of objects to be migrated. Before starting migration, the user should select the objects that will be migrated in this project. Until objects are selected, the Start Migration buttons remain disabled.
To add objects to the project, the user need to open the list of source database objects and select the required ones. The list of objects can be opened in two ways:
- Using the Add Source Objects button on the Dashboard workspace.
- Using the Add Source Objects button in the Project Objects Panel.

After clicking one of these buttons, the Source Objects Panel opens between the Sidebar Menu and the Project Objects Panel.

To add objects to a project, the user should:
- Open the Source Objects Panel.
- Select the desired objects.
- Click the Apply button (after clicking, the selected objects should appear in the Project Objects Panel).
- Close the Source Objects Panel.
Note: If objects are added to a project that already contains objects, the new objects will have no conversion or import status.
To remove objects from a project, the user should:
- Open the Source Objects Panel (previously selected objects are marked with checkmarks).
- Deselect or remove the desired objects.
- Click the Apply button (after clicking, the updated list of selected objects should be displayed in the Project Objects Panel).
- Close the Source Objects Panel.
Note: When objects are removed from a project, all statuses and files associated with those objects are deleted. If the same objects are added back to the project later, they will appear with empty statuses.
Settings
The SQLWays has the ability to configure the conversion using a set of parameters that determine how the source database objects are converted to the target database code.
Options
Before starting the migration, the user can adjust these settings on tab Options to influence key aspects of the conversion process, such as object naming rules, schema mapping, DDL generation, and target-specific syntax processing.
Until the configuration is checked and defined properly, the conversion behavior will follow the default settings, ensuring consistency of the basic parameters.
These parameters are organized into structured sections that allow users to control and expand the migration process.

They are not fixed for each project, they can be easily added, deleted(just for optional options) or changed in a way suitable for current project:

The shared sections apply globally to all migrations, while the DDL-related sections manage the process of creating database definitions. The sections related to a specific target database provide configuration options that apply only to the selected target database.
Each parameter is an individually configurable rule with a specific name, scope, and value. The parameters can use predefined enumerated values or custom text values. If no explicit value is specified, the system applies the default behavior defined by SQLWays.
The system also supports configuration expansion by adding new sections or custom settings. This allows users to adapt the conversion rules to the specific requirements of the project without changing the basic logic of migration.
Data Type and Schema Mapping
SQLWays provides flexible mapping capabilities that allow data types, schema names, and database object names to be transformed during migration. These features help adapt the generated target schema to the conventions and requirements of the destination environment without modifying the source database.
Data type mapping can be applied either globally across the entire database or selectively to individual tables and columns.
Schema mapping controls how source schema names are represented in the generated target code, while object name mapping allows database objects to be renamed as part of the migration process.
Global Data Type Mapping

Local Data Type Mapping

Schema Mapping

Object Name Mapping

These sections describe global and local data type mapping, schema mapping, and object name mapping, along with the scenarios in which each feature is most appropriate.
Once defined, all parameters are applied sequentially to the entire project, ensuring uniform behavior for all selected objects and all conversion runs. Before starting the migration, the configuration is checked to make sure that the set parameters are correct and complete.
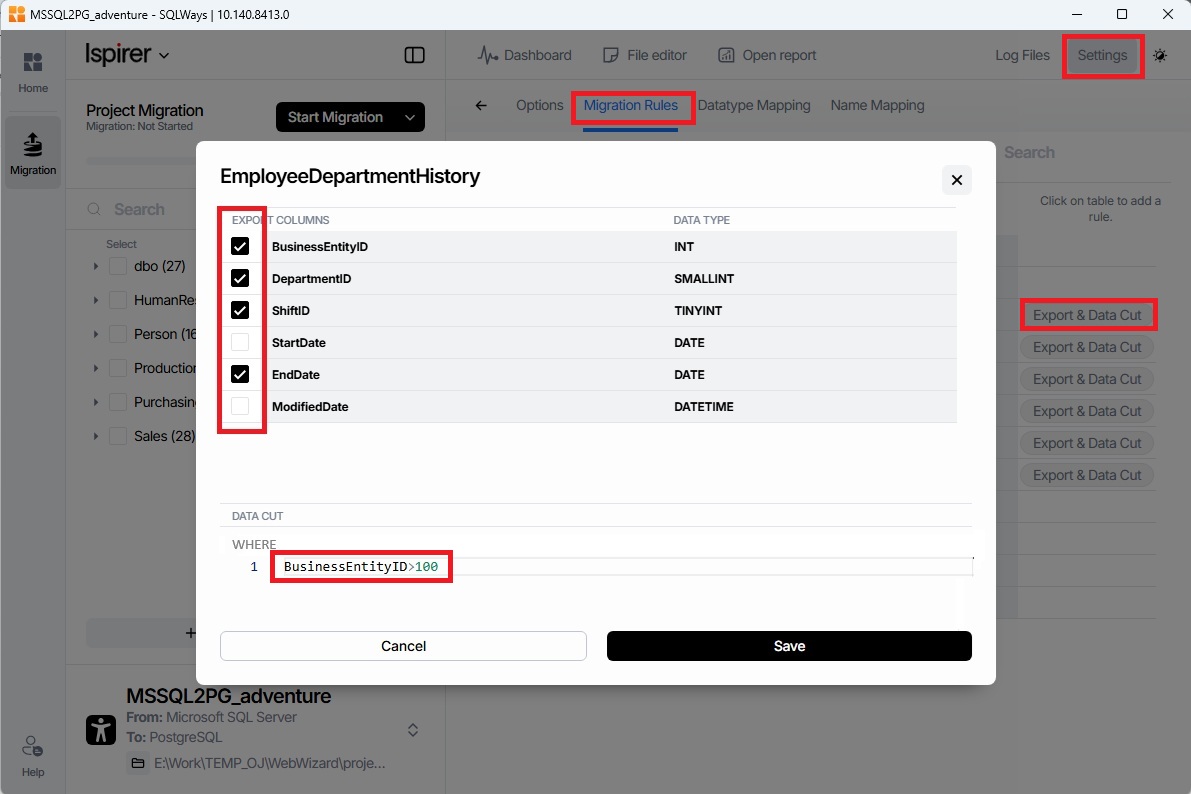
Migration Rules
This set of options is intended to configure object migration when it is necessary to split an object into separate parts. For example, you can use these options to:
- divide the migration of objects such as tables into logical components (DDL, data, indexes, and constraints) that can be imported separately;
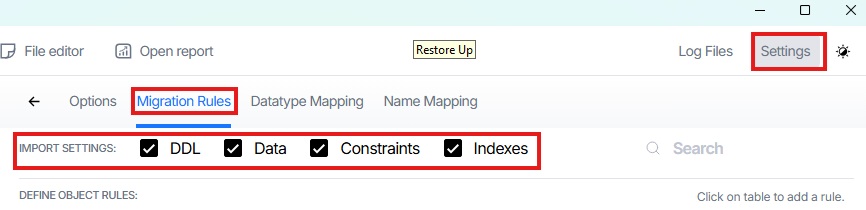
- exclude specific fields from the migration using checkboxes;
- reduce the volume of exported data by using the Data Cut option.
Start migration
Once objects are selected, the user can start one of the following processes: conversion, or migration (conversion + import).
Starting migration can be done by clicking the Start Migration button on the Dashboard or the Start Migration button above the Project Objects Panel. This will initiate the conversion, and if the project includes import, the import process will automatically start immediately afterward.

Starting conversion separately can be done by opening the drop-down menu on the Start Migration button above the Project Objects Panel and selecting Start Conversion. This will initiate conversion for all objects in the project. The import will not run automatically and should be started manually.

Starting import separately can be done by opening the drop-down menu on the Start Migration button above the Project Objects Panel and selecting Start Import. This will initiate import for all objects. The import can only be started in a project with import enabled and only if all objects have undergone conversion, regardless of their individual conversion status.

Results of migration
Migration results can be viewed on the Dashboard. The Dashboard displays the following information:
- Status of the conversion and import processes
- Total number of objects in the project
- Total number of converted objects
- Total number of imported objects
- Number of objects that failed during conversion or import

The status of each individual object and information by object type can be viewed in the Project Objects Panel. Each object displays its conversion status, import status, and general information about its type.

Edit conversion results
After migration, users can view the conversion results of objects generated by the tool. To do this, the user should click on the object name, and the corresponding file containing the resulting code for the selected object will open in the workspace.
The user can review the code, as well as see the object’s status and current errors in the Output panel.

If necessary, the user can manually edit the generated code. After making changes, the user can import the object with the modifications into the target database, provided the changes are saved beforehand. This can be done by clicking the Save button followed by Import Object.

After import, the object’s status should be updated to reflect the current state in the Output Window:

This allows the user to review all objects with errors, correct them manually, and import them into the target database directly from SQLWays interface.
Log files
SQLWays tool generates three types of log files:
- Conversion Log – contains information about the conversion process (sqlways.log). This file is generated during conversion.
- Import Log – contains information about the import process (sqlways_imp.log). This file is generated during import and includes details about loading converted objects into the target database. It is generated only when migrating to a database. If the target is an application or scripts are being converted, the import log is not generated.
- Trace File – generated when conversion is run in trace mode. It contains detailed information about the conversion process and is created by the sqlways.exe utility.
To open the log files, click the Log Files button in the top-right corner of SQLWays.